Money Money Money
So you've finally set up your Web site, plugged in some interesting content, and got yourself into the Google database. And, against all your expectations, the public actually likes your Web site. People are telling each other about it, and visiting it again and again. Slashdot decided to review it, and the results almost melted your ISP's network. And - wonder of wonders - people have started emailing you about advertising on your suddenly-popular Web site.
It doesn't take an Einstein to see that, somehow, you lucked out and hit on a good thing. Now, you need to start making some moolah. Those guys who wanted to advertise on your site? Drop them a line, tell them how much to pay, and ask them to send you their ads. And while you're waiting for the wire to hit, go and get yourself a copy of phpAds. Don't worry if you don't know what to do with it - I'll show you everything you need to know in the next couple of pages.
Getting Started
Let's start with the basics - what the heck is phpAds, anyhow?
phpAds, in the words of its author, is "a banner management and tracking system" for Web sites. It allows Web administrators to manage advertisers and advertiser banners on a Web sites, display them in a random or pre-defined arrangement, and deliver reports based on user impressions per banner. It's also pretty popular, and quite a few Web sites use it to manage their online advertising activities.
The first thing is to make sure that you have everything you need for a successful installation of phpAds. Typically, you'll need a PHP-compliant Web server (I'm using Apache), and a MySQL database server. Most Web hosting providers already offer these three components; however, in case yours doesn't, you can get Apache from http://www.apache.org, PHP from http://www.php.net and MySQL from http://www.mysql.com.
Once you've got all three packages configured and installed, download a copy of phpAds from the official Web site at http://www.phpwizard.net/, and uncompress it to a location under your server root.
$ tar -xzvf phpAds_1.4.0.tar.gzNext, create a MySQL database to store all the application information. Drop to a command prompt, and start up the MySQL client.
$ mysql
Welcome to the MySQL monitor.  Commands end with ; or \g.
Your MySQL connection id is 7311 to server version: 3.23.39

Type 'help;' or '\h' for help. Type '\c' to clear the buffer.

mysql>
Create a new database for the application (I've called mine "phpads").
mysql> CREATE DATABASE phpads;With the database created, it's time to set up all the required tables. This isn't as hard as it sounds - the phpAds distribution comes with a single SQL file, "all.sql", which contains all the SQL commands needed to set up the application's database tables. All you need to do is execute these commands via the MySQL's server's client program.
$ mysql -D phpads -u root -p < /usr/local/apache/htdocs/phpAds/all.sqlOnce the tables have been created, you need to set some configuration parameters so that the application knows where to find the database. Locate the "config.inc.php3" file in the application directory, pop it open it in your favourite text editor and modify the following parameters:
// MySQL hostname
$phpAds_hostname = "localhost";
// MySQL username
$phpAds_mysqluser = "root";
// MySQL password
$phpAds_mysqlpassword = "";
// The database phpAds lives in
$phpAds_db = "phpads";
// phpAds' database tables
$phpAds_tbl_adclicks = "adclicks";
$phpAds_tbl_adviews = "adviews";
$phpAds_tbl_banners = "banners";
$phpAds_tbl_clients = "clients";
$phpAds_tbl_session = "session";
$phpAds_tbl_acls = "acls";
// The URL to your phpAds-installation
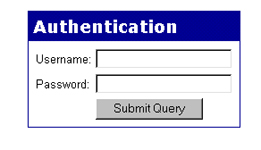
$phpAds_url_prefix = "http://www.melonfire.com/phpAds";Most of these parameters are self-explanatory - the database name, username and password, and the URL of the location the application is installed to. Once you've made the necessary changes, save the file, and attempt to access the application URL through your browser. If phpAds has been successfully installed and configured, you should see something like this:
Aaaaaand you're done! Flip the page to find out how you can begin using the application.
The Toy Store
As you saw on the previous page, phpAds requires a valid username and password to allow you access to the system. By default, the username is set to "tobias" and the password to "justdoit" (you can change these values in the phpAds configuration file); you should enter that username and password into the authentication boxes, and proceed to the application's main control panel.
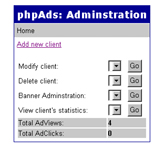
The first order of business is to add a new client - click the link near the top of the control panel, and you'll be taken to the appropriate page.

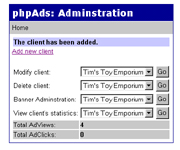
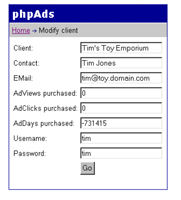
This page allows you to enter all the information about the client - name, contact information and login credentials for banner statistics. You can also set three other parameters per advertiser - AdViews, AdClicks and AdDays. Ignore these for the moment - I'll be revisiting them shortly - and submit the form. Your first advertiser should appear in the drop-down list boxes on the main control panel page.
You can modify the client information you just entered,
or even delete the client from the system.
Different Strokes
Once a client has been added to the system, the next step is to add banners for that client. Use the banner administration link on the main control panel to select the newly-added client, and you'll see a page that looks like this:
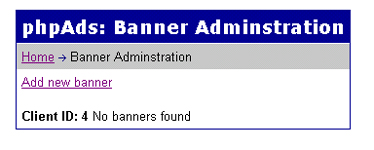
Obviously, there's nothing very interesting here yet, primarily because you haven't yet added any banners. So how about rectifying that, via the "add new banner" link?
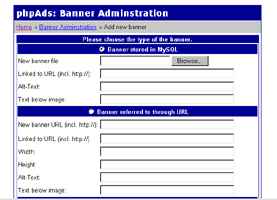
Now, phpAds allows three kinds of banner ads:
-
An image banner stored in the database. Here, the system requires you to upload an image, which is saved in the database as a binary object and retrieved whenever required.
-
An image banner accessed via a URL: In this case, the system requires you to specify a URL for the banner, and uses this URL to retrieve the banner whenever needed.
-
An HTML banner: In this case, the banner is not an image, but HTML code. This allows for more innovative banners, which may include form controls or table-formatted text.
Obviously, a banner also needs to point to something - which is why phpAds also requires you to enter a target URL for each of the three banner types listed above. For the image banners, you can also specify a line of text to be printed below the image.
Finally, phpAds also allows you to specify keywords for each banner that you display. These keywords are descriptive terms related to the content of the banner, or to the client, and come in handy when deciding which banner to display on which page.
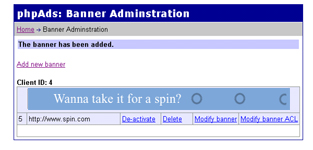
Once you've added a banner, it gets saved to the database, and phpAds takes you back to the banner administration screen, where you can deactivate, modify or delete the banner.
Pretty simple, huh? Go ahead, try it out yourself - add a couple of banners of each type to the system to see how it works, and then flip the page to see how you can integrate the ad rotator into your Web site.
Room With A View()
Remember how, a couple of pages back, you wondered what the AdViews, AdClicks and AdDays parameters were for in the client administration screen, and I rudely told you to shut up and sit down? Well, now that you know how banners work, it's safe to revisit those three mysterious parameters, and see where they fit in.
The AdViews parameter lets you specify the number of times the client's banners should be displayed to site visitors, while the AdClicks parameter lets you specify the number of banner clicks purchased by the client. The AdDays parameter lets you specify a duration for which the client's banners are valid; this value is used to calculate the expiry date for the customer's banners.
It should be noted, however, that the values above are largely toothless tigers, since phpAds does not automatically terminate display of the customer's banners once any of the values are exceeded. Rather, it merely uses them to warn the customer when his account is about to expire. This behaviour is somewhat strange - ideally, once the customer's account has expired, banner display should also stop - and you might want to correct it by modifying the source code of the application.
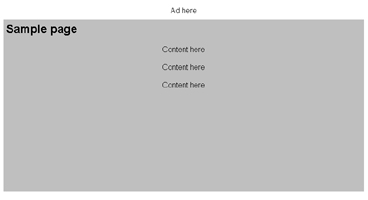
Anyway, back to business. Adding phpAds to your Web site is a pretty painless process - it merely involves adding a couple of hooks to your Web pages. In order to better understand it, consider the following simple HTML page:
<html>
<head>
<basefont face="Arial">
</head>

<body>

<table height="100%" width="100%" border="0" cellspacing="5" cellpadding="5">
<tr>
    <td align="center">Ad goes here</td>
</tr>
<tr>
    <td height="100%" width="100%" valign="top" bgcolor="silver" align="left">
    <h2>Sample page</h2>
    <center>
    Content here
    <p>
    Content here
    <p>
    Content here
    <p>
    </center>
    </td>
</tr>
</table>

</body>
</html>
Here's what it looks like:
Now, let's suppose I want to add a banner to this page. I've got my phpAds all set up with client information and a bunch of banners. The first step, then, is to include some required files at the top of my HTML (now PHP) page.
<?php
require("phpAds/config.inc.php3");
require("phpAds/view.inc.php3");
require("phpAds/acl.inc.php3");
?>
Next, I need to use the phpAds-supplied view() function to actually display a banner. This function takes five arguments, of which only the first one is compulsory. This first argument may be a banner ID, a keyword or image dimensions - phpAds will display a banner matching the argument specified.
In order to illustrate this, consider the following updated HTML page:
<?php
require("phpAds/config.inc.php3");
require("phpAds/view.inc.php3");
require("phpAds/acl.inc.php3");
?>
<html>
<head>
<basefont face="Arial">
</head>

<body>

<table height="100%" width="100%" border="0" cellspacing="5" cellpadding="5">
<tr>
    <td align="center"><?php view(15); ?></td>
</tr>
<tr>
    <td height="100%" width="100%" valign="top" bgcolor="silver" align="left">
    <h2>Sample page</h2>
    <center>
    Content here
    <p>
    Content here
    <p>
    Content here
    <p>
    </center>
    </td>
</tr>
</table>

</body>
</html>
When this page is accessed through a Web browser, phpAds will wake up, read the argument passed to view() - a banner ID - and display the banner corresponding to that ID.
If you look at the source of this page in your browser, you'll see that the call to
<?php view(15); ?>has been magically converted into a clickable hyperlink
<a href="http://www.melonfire.com/phpAds/click.php3?bannerID=15"><img src="http://www.melonfire.com/phpAds/viewbanner.php3?bannerID=15" width=100 height=100 border=0></a>Downside? You don't want this, because it means you'll always be stuck with the same banner on your page. And while loyalty is a nice concept, you're interested in satisfying as many customers as possible so that you can buy your own island and retire. Which is why you might prefer this:
<tr>
    <td align="center"><?php view("kids"); ?></td>
</tr>
In this case, phpAds will display a random banner containing the keyword "kids".
You can even display a banner on the basis of its dimensions. Consider the following example, which displays a random banner of size 600x60:
<tr>
    <td align="center"><?php view("600x60"); ?></td>
</tr>
If images aren't your thing, you can display an HTML banner by specifying the keyword "html" as an argument to view().
<tr>
    <td align="center"><?php view("html"); ?></td>
</tr>
There's a lot more that you can do with view() - and most of it is explained on the next page. Keep reading.
The Advanced Course
You'll remember that only the first argument to view() is compulsory - all the rest are optional. However, these optional arguments can come in pretty handy at times. For example, let's suppose you have a client who's paid you a premium to display only his banners on a particular page of your site. However, the view() function, by itself, displays a random customer's banner each time it is invoked. Not a Good Thing at all.
You can modify this default behaviour of the view() function by passing it a second argument, a client ID. This forces view() to only displays banners belonging to that client when it is invoked, and can come in handy when you want to mark certain pages as exclusive to particular customers. Here's an example, which only displays banners belonging to customer ID 21.
<?php view("teenagers", 21); ?>By default, clicked banners open up in the same browser window - which may not be acceptable to you. You can use the third argument to view() to specify a different target for clicks - as in the following example, which launches the target of each banner in the window named "ad".
<?php view("teenagers", 21, "ad"); ?>The fourth argument to view() is a Boolean, which allows you to hide or show the optional text under the banner. By default, the text display is turned off; you can turn it on with something like this.
<?php view("teenagers", 21, "ad", true); ?>The last optional argument to view() is probably also the most complex - it is used as a filter to restrict the banners displayed. It consists of an array, which in turn consists of one or more associative arrays. Each of these associative arrays contains a key - which must be either the equality operator == or the inequality operator != - and a value, which must be a banner ID. This series of nested arrays is used by phpAds to provide very focused control over which banners can appear on which pages.
Consider the following example, which displays two banners on the same page. Since the selection of banners is random, it's possible that the same banner could be repeated in both places. You can avoid this by creative use of the banner filter, as in the example below.
<?php
require("phpAds/config.inc.php3");
require("phpAds/view.inc.php3");
require("phpAds/acl.inc.php3");
?>
<html>
<head>
<basefont face="Arial">
</head>

<body>

<table height="100%" width="100%" border="0" cellspacing="5" cellpadding="5">
<tr>
    <td align="center"><?php $id = view("studio"); ?></td>
</tr>
<tr>
    <td height="100%" width="100%" valign="top" bgcolor="silver" align="left">
    <h2>Sample page</h2>
    <center>
    Content here
    <p>
    Content here
    <p>
    Content here
    <p>
    </center>
    </td>
</tr>
<tr>
    <td align="center"><?php view("studio", null, null, true, array(array("!=" => $id))); ?></td>
</tr>

</table>

</body>
</html>
In this case, the first call to view() returns a banner whose ID is stored in the PHP variable $id. The second call to view() then uses this $id variable, in combination with an inequality operator, to ensure that the same banner does not get repeated.
You can reverse things so that the same banner appears at both the top and bottom of the page, by using the equality operator instead of the inequality operator in the example above. Try it yourself and see.
Access Denied
It's also possible to further customize the display of each banner via an access control list (ACL). This access control list can be defined per banner, and it allows you to control the display of each banner by IP address, day of the week or client browser.
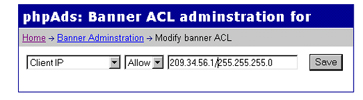
The following example demonstrates restricting banner display only to the client at the IP address 209.34.56.1.
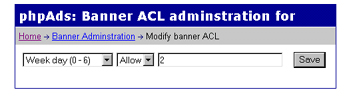
You can also restrict a banner to be only displayed on certain days of the week - as in the following example, which sets banner display to Tuesday only.
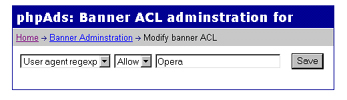
Finally, you can use a regular expression to match banners to client browsers - the following example only displays the banner to users running the Opera browser.
The Number Game
Finally, the crown jewels, at least as far as your advertisers are concerned - the numbers which demonstrate how many eyeballs have seen their banner, and how many clicks have resulted. In order to assist you in generating these reports, phpAds comes with a fairly capable statistics module, which can provide your advertisers with hard data on what their hard-earned dollars have really bought them.
You can access the phpAds statistics module from the main control panel, by selecting an advertiser and hitting the Go button.
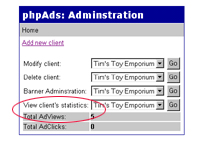
phpAds will produce a summary report of the number of views and clicks per banner for that advertiser.
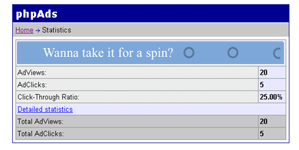
As you can see, phpAds will also do a rough calculation in order to produce what it calls a click-through ratio - essentially, the percentage of views that were converted into actual clicks. The higher this number, the better it is for the advertiser (and your bank account).
You can also have phpAds produce a weekly report for you, by asking it for detailed statistics. In this case, you'll get a very neat little graph showing you the activity over the past seven days; you can even drill down to see a more detailed view for each day.
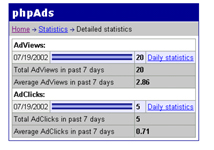
Note that your PHP build must support the GD graphics library in order to build these graphs.
This kind of data is very useful to both you and your advertisers, in judging the popularity of your site, and the value obtained per advertising dollar.
It should be noted at this point that these reports are not only available to you, the site administrator - you can even have your clients view them directly, via phpAds' client interface, available at http://your-server/your-phpAds-directory/client/. Remember the username and password you entered for the client at the beginning? These can be used by the client to access click statistics directly.
Endgame
And that's about it for this tutorial. In this article, I introduced you to one of the more popular banner management programs out there, and explained how you could integrate and use it on your own Web site. I guided you through the process of installing and configuring phpAds, showed you how to add clients and banners, and also illustrated, with a simple example, the additions you need to make to your Web pages to display these banners. Finally, I rounded the discussion up with a look at some of the additional options available in the view() function, and a brief description of the data that is generated via the application's statistics module.
I hope you found all of the above interesting, and that it encouraged you to try out phpAds on your own Web site. So go on - give it a shot...and if you hit it big, remember to invite me to the party!
Note: All examples in this article have been tested on Linux/i586 with PHP 4.2.0, Apache 1.3.12 and phpAds 1.4.20. Examples are illustrative only, and are not meant for a production environment. Melonfire provides no warranties or support for the source code described in this article. YMMV!
This article was first published on19 Jul 2002.