The Toolbox
In the first part of this article, I introduced you to Samba, the open-source software suite that makes it possible to transparently share files on a network composed of both Windows and *NIX clients using the Server Message Block (SMB) protocol. I showed you to how to install and configure Samba, and also demonstrated the most common examples of its usage in a small- or medium-sized office network.
In this concluding part, I'll be spending some time on the ancillary utilities that are included with the Samba package, showing you how they can be used to connect to other SMB clients, mount SMB file systems, perform backups of user data, and manage common administrative tasks using a Web-based tool. All that and more, inside - so keep reading!
What's In A Name?
In case you're working in an environment that is sensitive to file names, you can use Samba's "name mangling" capabilities to impose a particular set of rules on the filenames it creates. Consider the following addition to the "smb.conf" file, which ensures that the name of every file created on the Samba server is upper-cased.
[global]
        default case = upper
        preserve case = no
Over here, the "default case" attribute sets the default case for new filenames, while the "preserve case" attribute controls whether filenames are preserved as is, or if they are forcefully changed to a different case.
If your server implements disk quotas for users or groups, you can have Samba respect these quotas as well; simply recompile it and, this time, add the "with-quotas" argument to the "configure" script. Once you've got a new Samba binary built and installed, you should find that the system automatically restricts you from using more than your allotted disk space.
Consider the following example, which demonstrates by first setting the quota for the "accounts" group (506) to 2 MB,
$ quotatool -g 506 -b -q 2048 -l 2048  /dev/hda2

$ quota -g accounts
Disk quotas for group accounts (gid 506):
     Filesystem  blocks   quota   limit   grace   files   quota   limit   grace
      /dev/hda2    1928    2048    2048              0       0       0
and then attempting to use more than the allotted disk space via the "smbclient" utility:
$ smbclient //olympus/groups
added interface ip=192.168.3.1 bcast=192.168.3.255 nmask=255.255.255.0
added interface ip=192.168.0.77 bcast=192.168.0.255 nmask=255.255.255.0
Password:
Domain=[MEDUSA] OS=[Unix] Server=[Samba 2.2.5]
smb: \> cd accounts
smb: \accounts\> mput samba-latest.tar.gz
putting file samba-latest.tar.gz as \accounts\samba-latest.tar.gz Error writing file: NT_STATUS_DISK_FULL
(326.4 kb/s) (average 326.4 kb/s)
smb: \accounts\>
As you can see, Samba returns a "disk full" error as soon as the group exceeds its allotted quota.
Making Conversation
You're already familiar with the "smbclient" utility - I used it when first configuring and testing Samba. But "smbclient" can do a lot more than just verify that your Samba installation is working as advertised - it's actually a full-featured FTP-like SMB client that can be used to perform file transfer and manipulation operations with an SMB server.
You can start up "smbclient" by providing it with a host name and share name to access.
$ /usr/local/samba/bin/smbclient //medusa/music
Password:
smb: \>
Once you're connected to that share, you can use standard commands to transfer files, read file information and perform other common file operations. Consider the following sample session, which should demonstrate most of the common operations:
smb: \> cd
Current directory is \
smb: \> mkdir temp
smb: \> cd temp
smb: \temp\> dir
  .                                   D        0  Tue Oct  8 17:09:18 2002
  ..                                  D        0  Tue Oct  8 17:09:18 2002

                63882 blocks of size 32768. 1681 blocks available
smb: \temp\> put menu.php
putting file menu.php as \temp\menu.php (53.0271 kb/s) (average 53.0273 kb/s)
smb: \temp\>
smb: \> mput *.zip
Put file www.zip? y
smb: \> q
$
You can obtain help by typing
smb: \> help
ls             dir            du             lcd            cd
pwd            get            mget           put            mput
rename         more           mask           del            open
rm             mkdir          md             rmdir          rd
prompt         recurse        translate      lowercase      print
printmode      queue          cancel         quit           q
exit           newer          archive        tar            blocksize
tarmode        setmode        help           ?              history
!
at the command prompt, or a one-line description of each command by typing "help" followed by the command name.
smb: \> help mkdir
HELP mkdir:
        <directory> make a directory
In case you're having difficulty connecting to shares, you can have "smbclient" generate debug data by adding the "-d" command-line option, followed by a number from 0 to 10; the higher the number, the greater the level of detail provided. Consider the following example, which demonstrates:
$ /usr/local/samba/bin/smbclient //medusa/music -d 5
Client started (version 2.0.6).
resolve_lmhosts: Attempting lmhosts lookup for name medusa<0x20>
getlmhostsent: lmhost entry: 127.0.0.1 localhost
resolve_hosts: Attempting host lookup for name medusa<0x20>
resolve_wins: Attempting wins lookup for name medusa<0x20>
bind succeeded on port 0
nmb packet from 127.0.0.1(137) header: id=15735 opcode=Query(0) response=No
header: flags: bcast=No rec_avail=No rec_des=Yes trunc=No auth=No
header: rcode=0 qdcount=1 ancount=0 nscount=0 arcount=0
question: q_name=MEDUSA<20> q_type=32 q_class=1
Sending a packet of len 50 to (127.0.0.1) on port 137
read_udp_socket: lastip 127.0.0.1 lastport 137 read: 62
parse_nmb: packet id = 15735
Received a packet of len 62 from (127.0.0.1) port 137
nmb packet from 127.0.0.1(137) header: id=15735 opcode=Query(0) response=Yes
header: flags: bcast=No rec_avail=Yes rec_des=Yes trunc=No auth=Yes
header: rcode=0 qdcount=0 ancount=1 nscount=0 arcount=0
answers: nmb_name=MEDUSA<20> rr_type=32 rr_class=1 ttl=496220
answers 0 char ...... hex 0000C0A8008F
Got a positive name query response from 127.0.0.1 ( 192.168.0.143 )
Connecting to 192.168.0.143 at port 139
write_socket(3,76)
write_socket(3,76) wrote 76
Sent session request
got smb length of 0
size=0
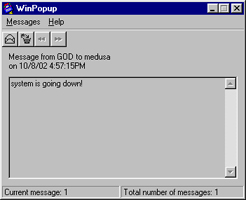
... and so on (snip!) ...One of the cooler (and also more annoying) things you can do with "smbclient" involves using it to send text messages across a network to Windows workstations. These messages appear on the target Windows workstation via the WinPopup utility. Consider the following example, which demonstrates:
$ /usr/local/samba/bin/smbclient -M medusa
Connected. Type your message, ending it with a Control-D
system is going down!
sent 25 bytes
$
When this message is sent to the Windows workstation named "medusa", it pops up as a dialog box on that machine (note that in order for this to work, WinPopup must be installed on the target system, and must be configured to accept and display messages).
Mounting Up
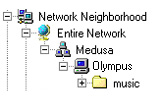
Thus far, you've been sharing directories on the server with Windows clients through Samba. But here's a twist - what if you want to mount a shared directory on another workstation on the server?
Samba allows you to do this via its very cool "smbmount" utility. Let's assume that there exists a Windows machine on the network named "clubhouse", and it exposes a share named "music". In order to mount this share on my Linux server ("olympus"), I'd first need to create a mount point
$ mkdir /mnt/musicand then use the "mount" command (which internally calls "smbmount") to mount the share using standard SMB syntax.
$ mount -t smbfs //clubhouse/music /mnt/musicOnce the share has been mounted on the Linux server, I can manipulate it using standard Linux filesystem commands:
$ ls -l /mnt/music

$ tar -czvf /tmp/archive.tgz /mnt/music/*
Let's take it one step further. I can now share this mounted directory as a Samba share on the Linux server, so that other connecting clients can see it as well. Here's the addition to the "smb.conf" file:
[music]
        comment = Music
        path = /mnt/music
        public = yes
        writeable = no
Connecting clients will now be able to see the "music" directory on machine "clubhouse" as a share named "music" on the "olympus" Samba server.
This is a roundabout way of doing things, but it's an interesting experiment nevertheless, and it serves to demonstrate how easy Samba makes it to create links between different systems and machines.
You can unmount mounted SMB filesystems with the "smbumount" command, in the usual manner:
$ umount /mnt/musicBacking Up
Samba also comes with the "smbtar" utility, which is expressly designed to simplify the process of backing up shares across a network. You can back up (and restore) a shared folder on a Windows workstation using the "smbtar" command, as demonstrated in the following example:
$ /usr/local/samba/bin/smbtar -v -s clubhouse -x music
server    is clubhouse
share     is music\
tar args  is
tape      is tar.out
blocksize is
added interface ip=192.168.3.1 bcast=192.168.3.255 nmask=255.255.255.0
added interface ip=192.168.0.77 bcast=192.168.0.255 nmask=255.255.255.0
Got a positive name query response from 192.168.0.143 ( 192.168.0.143 )
tarmode is now full, system, hidden, noreset, verbose
In this case, the "smbtar" utility creates a TAR archive of the files located at the share "//clubhouse/music", and stores the result in a file named "tar.out".
By default, the "smbtar" utility looks for a share named "backup" on the specified SMB server. This makes it easy to schedule regular backups of Windows workstations in an office environment - simply ask each user to create a share named "backup" on their individual workstations containing the files they'd like to have archived, and run a script on the server at regular intervals (via cron) to connect to each workstation, look for a share named "backup", and - if it exists - archive its contents to a TAR file.
Keeping It Simple
If you're the kind of person who finds it hard to deal with text files, Samba comes with a graphical, browser-based interface that helps you configure the software without resorting to manually editing configuration files. This tool, affectionately known as SWAT (Samba Web Administration Tool), provides an easy-to-use graphical interface to the numerous configuration directives available in the "smb.conf" file.
Although the "swat" binary is installed as part of the standard Samba installation process, and is typically located at /usr/local/samba/bin/swat, you need to jump through a couple more hoops in order to get it running. Since SWAT usually runs on port 901, the first hoop involves editing the "inetd" daemon's configuration files to let it know about this port. Pop open your "inetd" services file (usually /etc/services) and add the following line to it:
swat 901/tcpNext, tell "inetd" a little bit more about the service that will be running on that port, in /etc/inetd.conf:
swat stream tcp nowait.400 root /usr/local/samba/bin/swat swatRestart the "inetd" server and try browsing to the URL
http://olympus:901/where "olympus" is the name of the server Samba has been installed on.
After entering the administrator user name and password, you should be rewarded with the SWAT opening screen, which looks like this:
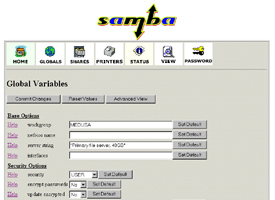
You can now use the point-and-click interface to set up, edit and remove shares; define privilege levels and permissions; control name mangling and perform other common tasks. SWAT also includes context-sensitive help for each configuration option available in Samba, so that you have an easy way to refer to the meanings of the various directives. It's quick, reliable and relatively pain-free...and infinitely simpler than using Vi!
SWAT isn't the only GUI to Samba, however - you should also take a look at Komba, a KDE variant (http://komba.sourceforge.net/) and SambaLink/Q, a QT-based alternative (http://www.spanware.com/linkq/sambalinkq.html)
Working The Web
Over the course of this two-part article, I've taught you a little bit about Samba, and showed you how you can use it for seamless file sharing between *NIX and Windows systems. I also spent a little time on the ancillary tools that ship with Samba, demonstrating how they can be used to accomplish common tasks like file backup, point-and-click configuration and SMB share manipulation.
This isn't all you can do with Samba, though - there's a whole lot more, including some pretty advanced tricks that allow you to have your Samba server mimic a Windows NT server, and integrate into your network. Those topics are a little beyond this introductory tutorial - however, you can read up on them at the following links:
Exploring Samba, at http://www.linuxplanet.com/linuxplanet/tutorials/2047/1/
Using Samba as a Primary Domain Controller, at http://www-1.ibm.com/servers/esdd/tutorials/samba.html
The Unofficial Samba HOW-TO, at http://hr.uoregon.edu/davidrl/samba.html
The Samba FAQ, at http://sg.samba.org/samba/docs/FAQ/
Or - if you're really curious - drop me a line and tell me what you'd like to read about. Until then...ciao!
Note: All examples in this article have been tested on Linux/i586 with Samba 2.2.5 and Windows 98. Examples are illustrative only, and are not meant for a production environment. Melonfire provides no warranties or support for the source code described in this article. YMMV!
This article was first published on11 Oct 2002.