Miracle Cure
There's a very famous quotation that's been running through my head for the past couple of days: "Music soothes the savage breast". In fact, it got to the point where I had to sit down and run it through Google, just to see where it originated. According to what I found, the quote is from a play called "The Mourning Bride", by William Congreve, and it's actually "Music hath charms to soothe the savage breast".
What does this have to do with anything? Well, over the last couple of weeks, I've been indulging myself, listening to some of my favourite tunes while I work. And it seems to be having an effect - like plants who respond to their owners talking to them, my code seems to be flowing better, and I leave the office at the end of the day happier and less resentful about my job.
Even my colleagues have noticed - just last week, after speaking to a particularly persistent engineer from QA, I didn't stomp around the office and hurl things out of the window as I usually do. Instead, I just murmured a quiet "Cretin!", and went back to work.
My co-workers think I'm in love. But I know it's all thanks to Icecast.
The Iceman Cometh
In the words of its official documentation, Icecast is "...a streaming media server which currently supports Ogg Vorbis and MP3 audio streams...it can be used to create an Internet radio station or a privately running jukebox and many things in between". It's arguably one of the oldest - and most popular - audio streaming systems available, and the reason I'm grinning so much lately is that we recently set up one on an old Linux box we had lying around in the office. As a result, users anywhere on our office LAN can tune in and listen to any of the three channels of streaming music we've set up, without any of the lags and disruptions commonly associated with online radio stations.
Sounds cool? You bet it is! And it's incredibly easy to set up as well...once you know the basics.
There are two primary components to the Icecast project:
-
The server: The server component of the project, appropriately enough named icecast, accepts audio content from one or more source clients, and streams it out to players. The server also keeps track of connected clients, and makes available information on the audio tracks being played, their duration, and their mountpoints. A single Icecast server can have multiple streams being broadcast simultaneously, each one located at a different mountpoint (think of a mountpoint as a channel on the radio).
-
The source client: The source client, named iceS, reads an audio file, either in MP3 or Ogg Vorbis format, and streams it to a server. Typically, the source client must log in to the server with correct authentication credentials before the server will accept the audio content. iceS can also be programmed to use playlists to send audio files to the server in a pre-defined sequence.
Once you've got the Icecast server and source client set up, any player capable of reading an Icecast stream can connect to the server and begin "listening" to the audio stream being played. Most of today's audio players, including Winamp and Windows Media Player, are capable of decoding Icecast streams, making it easy to test and use the system.
If you need to stream live audio instead of pre-canned audio files, Icecast can easily be hooked up to audio encoders to enable you to do this (at different bitrates if necessary). And Icecast also includes support for a couple of more advanced features: relaying, in which an audio stream from one server is mirrored on to another server for more optimal resource usage; and support for YP listings, in which the server's audio streams are displayed in real-time in a public YP directory.
Now that you have the background - let's get to work, by installing and configuring Icecast.
Source Control
The first order of business to install the Icecast system on the Linux box you plan to use as the server. There are two separate applications you need to download and install here: the server software, called icecast, and the source client for audio files, called iceS. I'll start with the server - drop by the official icecast Web site at http://www.icecast.org/ and get yourself the latest stable release of the server software (this tutorial uses icecast 2.0-beta).
Note that you will need a C compiler and a running Web server in order to use the software (this tutorial uses GCC 3.2 and Apache 1.3.26).
Once you've downloaded the source code archive to your Linux server, log in as "root"
$ su -
Password: ****
and extract the source to a temporary directory.
$ cd /tmp
$ tar -xzvf /home/me/icecast-2.0-beta-1.tar.gz
The next step is to configure the package using the provided "configure" script. Since I'd like to install the server to "/usr/local/icecast/", I'll specify that location as an argument to "configure".
$ cd /tmp/icecast-2.0-beta-1
$ ./configure --prefix=/usr/local/icecast
Next, compile and install it.
$ make
$ make install
icecast should now have been installed to the directory "/usr/local/icecast/".
Next, download and install the iceS binary - you can get it from the same Web site. You should also download a copy of libshout, which is required by iceS. Here, I've used iceS 0.3 and libshout 2.0.
Once you've downloaded the source code archive to your Linux server, extract the sources to a temporary directory.
$ cd /tmp
$ tar -xzvf /home/me/libshout-2.0.tar.gz
$ tar -xzvf /home/me/ices-0.3.tar.gz
Next, configure compile and install libshout,
$ cd /tmp/libshout-2.0
$ ./configure
$ make
$ make install
followed by iceS.
$ cd /tmp/ices-0.3
$ ./configure --prefix=/usr/local/icecast
$ make
$ make install
iceS should now have been installed to "/usr/local/icecast/" - I've installed it to the same location as the icecast server binary for convenience.
Once you've got the server and source client installed, the next step is to configure them. I'll start with the server, next.
Service With A Smile
Both icecast and iceS are configured by means of XML configuration files, samples of which are placed in the installation's "etc/" directory by the installation process. I'll begin by configuring the icecast server; pop open the "/usr/local/icecast/etc/icecast.xml" file in your favourite text editor, and take a look at it. You should see something like this:
<icecast>
    <limits>
        <clients>100</clients>
        <sources>2</sources>
        <threadpool>5</threadpool>
        <queue-size>102400</queue-size>
        <client-timeout>30</client-timeout>
        <header-timeout>15</header-timeout>
        <source-timeout>10</source-timeout>
    </limits>

    <authentication>
        <!-- Sources log in with username 'source' -->
        <source-password>hackme</source-password>
        <!-- Relays log in username 'relay' -->
        <relay-password>hackme</relay-password>

        <!-- Admin logs in with the username given below -->
        <admin-user>admin</admin-user>
        <admin-password>hackme</admin-password>
    </authentication>

    <!-- Uncomment this if you want directory listings -->
    <!--
    <directory>
        <yp-url-timeout>15</yp-url-timeout>
        <yp-url>http://dir.xiph.org/cgi-bin/yp-cgi</yp-url>
    </directory>
    <directory>
        <yp-url-timeout>15</yp-url-timeout>
        <yp-url>http://www.oddsock.org/cgi-bin/yp-cgi</yp-url>
    </directory>
    <directory>
        <yp-url-timeout>15</yp-url-timeout>
        <yp-url>http://yp.icecast.net/cgi-bin/yp.cgi</yp-url>
    </directory>
     -->

    <hostname>localhost</hostname>

    <!-- You can use these two if you only want a single listener -->
    <!--<port>8000</port> -->
    <!--<bind-address>127.0.0.1</bind-address>-->

    <!-- You may have multiple <listener> elements -->
    <listen-socket>
        <port>8000</port>
        <!-- <bind-address>127.0.0.1</bind-address> -->
    </listen-socket>
    <!--
    <listen-socket>
        <port>8001</port>
    </listen-socket>
    -->

    <!--<master-server>127.0.0.1</master-server>-->
    <!--<master-server-port>8001</master-server-port>-->
    <!--<master-update-interval>120</master-update-interval>-->
    <!--<master-password>hackme</master-password>-->
    <!--
    <relay>
        <server>127.0.0.1</server>
        <port>8001</port>
        <mount>/example.ogg</mount>
        <local-mount>/different.ogg</local-mount>

        <relay-shoutcast-metadata>0</relay-shoutcast-metadata>
    </relay>
    -->

    <!-- Only define a <mount> section if you want to use advanced options,
         like alternative usernames or passwords
      -->
    <mount>
        <mount-name>/example-complex.ogg</mount-name>

        <username>othersource</username>
        <password>hackmemore</password>

        <max-listeners>1</max-listeners>
        <!-- <dump-file>/tmp/dump-example1.ogg</dump-file> -->
        <fallback-mount>/example2.ogg</fallback-mount>
    </mount>

    <fileserve>1</fileserve>

    <paths>
        <basedir>/usr/local/icecast/share/icecast</basedir>

        <!-- Note that if <chroot> is turned on below, these paths must both
             be relative to the new root, not the original root -->
        <logdir>/usr/local/icecast/var/log/icecast</logdir>
        <webroot>/usr/local/icecast/share/icecast/web</webroot>
        <adminroot>/usr/local/icecast/share/icecast/admin</adminroot>

        <!-- Aliases: treat requests for 'source' path as being for 'dest' path
             May be made specific to a port or bound address using the "port"
             and "bind-address" attributes.
          -->
        <!--
        <alias source="/foo" dest="/bar"/>
          -->
    </paths>

    <logging>
        <accesslog>access.log</accesslog>
        <errorlog>error.log</errorlog>
        <loglevel>4</loglevel> <!-- 4 Debug, 3 Info, 2 Warn, 1 Error -->
    </logging>

    <security>
        <chroot>0</chroot>
        <!--
        <changeowner>
            <user>nobody</user>
            <group>nogroup</group>
        </changeowner>
        -->
    </security>
</icecast>
A number of configuration variables are present in this file - these allow you a fair degree of control over the server, and can be used to optimize it for your specific requirements. Here's a list of the important sections and variables:
- The
<limits>section allows you to control the maximum number of listeners and source clients that can connect to the server. Within this section, the<clients>element controls the maximum number of concurrent listeners, the<sources>element controls the maximum number of concurrent source clients, the<queue-size>element controls how long to hold lagging clients for, and the<header-timeout>,<client-timeout>and<source-timeout>elements specify how long the server should wait in the event of non-response from the respective client type.
If you're optimizing the server for use on low-bandwidth networks or high-traffic servers, this <limits> section is very useful - experiment with different combinations of the settings above until the server behaves in the manner you want it to.
- The
<authentication>section holds information on the passwords required to connect to the server. Listeners don't need a password to connect to the server and listen to streams; however, source clients do, and this password can be set via the<source-password>element. Similarly, in order to use the Web-based administration module, administrative users must provide the correct user name and password - these values are controlled by the<admin-user>and<admin-password>elements respectively.
You must change the default values in this configuration file before you start the server, so as to increase the security of your installation.
- The
<paths>section of the file tells icecast where to find its files. The most important element here is the<logdir>value, which specifies which directory to use for the icecast log files. The installation script sets this to "/var/log/icecast/", which is usually fine - change it to something else if you need to, and flip forward to read about how this directory is to be set up. The<adminroot>and<webroot>directories specify the location to the Web-based interfaces to the server, and can usually be left as is.
Within this section, you can improve the security of your installation by adding a <basedir> element - this specifies the location of the chroot() jail the server automatically goes into when it starts up, and is only active if the <chroot> element in the <security> section holds a value of 1. For our local server, I didn't bother setting this up since it was already heavily protected; however, if you're setting up a public server, this is recommended.
-
Also related to logging is the
<logging>section, which specifies the names for the various log files. The<acccesslog>element specifies the name of the access log file, which logs all connections to the server (together with IP address and timestamp), while the<errorlog>element specifies the name of the file to which all errors are logged. The<loglevel>element specifies the logging level - 4 is the highest and generates debug messages as well as warnings and fatal errors, while 1 is the lowest, only logging fatal errors. -
The
<directory>section specifies the list of public directory servers icecast should tell about your stream. This is only useful if you're running a public icecast server, like an online radio station, and you want users to be able to find your streams through public YP servers. Most often, the default values are just fine here, and you can even remove them if you're running on a private network. -
Finally, the
<security>section specifies the user and group the server should run as. I'd recommend that you always run the server as "nobody", the least privileged user on the system, to avoid someone breaking in and gaining a high level of access to the system. Note that the user and group specified in this section must actually exist on the system, or the server will generate an error.
You can also use the <chroot> element to turn on the chroot() jail - if this is on, the server will automatically make its root directory the location specified in the <basedir> element, thereby restricting unauthorized break-ins to a limited area.
Most often, you won't need to change too many things in this file - it's generated by the installation script, so that paths and settings in it are mostly correct. However, you will need to make some changes, primarily to the <limits> section to allow more clients to use the server, the <authentication> section to change the default passwords, and the <security> section to ensure that the server runs as a non-privileged user. Take a look at my revised version of the file above, which incorporates these changes (I've added comments so that it's clearer):
<icecast>
    <!-- set hard limits for server usage -->
    <limits>

        <!-- max number of clients at a time -->
        <clients>100</clients>

        <!-- max number of sources at a time -->
        <sources>25</sources>

        <!-- number of threads available to handle clients -->
        <threadpool>5</threadpool>

        <!-- size of internal queue maintained for each client -->
        <queue-size>102400</queue-size>

        <!-- timeout for clients -->
        <client-timeout>60</client-timeout>

        <!-- timeout for clients to send headers -->
        <header-timeout>15</header-timeout>

        <!-- timeout for sources to start sending content -->
        <source-timeout>10</source-timeout>
    </limits>

    <authentication>
        <!-- password for source clients -->
        <source-password>abcdef</source-password>

        <!-- username/password for admin -->
        <admin-user>admin</admin-user>
        <admin-password>1q2w3e4r</admin-password>
    </authentication>

    <!-- hostname of the server -->
    <hostname>olympus.local.net</hostname>

    <!-- port for server to listen to for incoming connections -->
    <listen-socket>
        <port>8000</port>
    </listen-socket>

    <!-- file locations -->
    <paths>
        <!-- chroot jail for server -->
        <basedir>/usr/local/icecast/share/icecast</basedir>

        <!-- log files -->
        <logdir>/var/log/icecast</logdir>

        <!-- files for Web and admin modules -->
        <webroot>/usr/local/icecast/share/icecast/web</webroot>
        <adminroot>/usr/local/icecast/share/icecast/admin</adminroot>
    </paths>

    <!-- log file names and log level -->
    <logging>
        <accesslog>access.log</accesslog>
        <errorlog>error.log</errorlog>
        <loglevel>4</loglevel> <!-- 4 Debug, 3 Info, 2 Warn, 1 Error -->
    </logging>

    <!-- security settings -->
    <security>
        <!-- run server as this user/group -->
        <changeowner>
            <user>nobody</user>
            <group>nogroup</group>
        </changeowner>
    </security>
</icecast>
Before you can start up the server, there's one more thing you need to do - set up the logging directory "/var/log/icecast/". This task is something you must do manually, as the installation script does not handle it for you. Here's how:
$ mkdir /var/log/icecastYou must also change the permissions for this directory so that the "nobody" user can write files to it. Here's how:
$ chown nobody.nogroup /var/log/icecast
$ chmod 777 /var/log/icecast
And that's it! Your server should now be ready for action. Try invoking it by passing it the name of the configuration file as parameter:
$ /usr/local/icecast/bin/icecast -c /usr/local/icecast/etc/icecast.xml &
Changed groupid to 99.
Changed userid to 99.
At a later date, you might want to add the command above to your startup scripts, so that icecast starts automatically at system bootup.
You can check that the server is running with a quick call to the "ps" command, as below:
$ ps ax | grep icecast
 1094 pts/0    S      0:00 [icecast]
 1095 pts/0    S      0:00 [icecast]
 1096 pts/0    S      0:00 [icecast]
 1097 pts/0    S      0:00 [icecast]
 1098 pts/0    S      0:00 [icecast]
 1099 pts/0    S      0:00 [icecast]
 1100 pts/0    S      0:00 [icecast]
 1101 pts/0    S      0:00 [icecast]
 1102 pts/0    S      0:00 [icecast]
 1103 pts/0    S      0:00 [icecast]
Next, how about streaming some content to the server?
Surfing The Stream
Streaming music to the server is handled by iceS, the source client. You may remember that you already compiled and installed this component a couple pages back - now, all that's left is to use it. The first step in doing so is to build a playlist of tracks to be streamed to the server. This playlist is nothing but a plain text file containing absolute paths to the various audio files (OGG and MP3 files, in this case) to be streamed to the server, one per line. Here's what it might look like:
/data/audio/pop/track11.ogg
/data/audio/pop/track163.mp3
/data/audio/pop/track26.ogg
/data/audio/jazz/track126.ogg
/data/audio/jazz/track107.ogg
/data/audio/dance/track192.ogg
/data/audio/dance/track748.mp3
/data/audio/dance/track172.ogg
If you have a large collection of audio files, the quickest way to create this file is to pipe the output of "ls" into a text file, as below:
$ ls -1 /my/files/*.ogg > playlist.txtOnce you've got the playlist created, hand it over to iceS to begin streaming the respective files, like this:
$ /usr/local/icecast/bin/ices -h olympus.local.net -p 8000 -P abcdef -F /tmp/playlist.txt -m 80s -n "Local OGG Stream" -g "80s Stuff" -d "Good ol' pop, rock and jazz" -v -t http &
Logfile opened
DEBUG: Sending following information to libshout:
DEBUG: Stream: 0
DEBUG: Host: olympus.local.net:8000 (protocol: http)
DEBUG: Mount: /80s, Password: abcdef
DEBUG: Name: Local OGG Stream   URL: http://www.icecast.org/
DEBUG: Genre: 80s Stuff Desc: Good ol' pop, rock and jazz
DEBUG: Bitrate: 128     Public: 1
DEBUG: Dump file: (null)
DEBUG: Initializing playlist handler...
DEBUG: Initializing builting playlist handler...
DEBUG: Builtin playlist handler serving: /tmp/track11.ogg
DEBUG: Filename cleaned up from [/tmp/track11.ogg] to [track1]
Playing /tmp/track11.ogg
Mounted on http://olympus.local.net:8000/80s
DEBUG: Delaying metadata update...
DEBUG: Updated metadata on 80s to: track1
DEBUG: Updated metadata on 80s to: track1
At this point, your audio file should be available as a stream to any interested listener. On the next page, I'll show you how to listen to what's playing...but first, a quick explanation of the various options to iceS on the command line above:
$ /usr/local/icecast/bin/ices --help
This is ices 0.3
ices <options>
Options:
        -B (Background (daemon mode))
        -b <stream bitrate>
        -c <configfile>
        -D <base directory>
        -d <stream description>
        -f <dumpfile on server>
        -F <playlist>
        -g <stream genre>
        -h <host>
        -i (use icy headers)
        -M <interpreter module>
        -m <mountpoint>
        -n <stream name>
        -p <port>
        -P <password>
        -R (activate reencoding)
        -r (randomize playlist)
        -s (private stream)
        -S <perl|python|builtin>
        -u <stream url>
        -v (verbose output)
        -H <reencoded sample rate>
        -N <reencoded number of channels>
If you're sharp-eyed, you'll notice that my command line above includes an additional, undocumented parameter - the "-t" parameter, which tells iceS what protocol to use when communicating with the icecast server. For some reason, this option is missing from the help text displayed by iceS; expect this to be corrected in a future version of the application.
You can also have iceS read these values from a configuration file, instead of specifying them on the command line. Consider the following configuration file, which is equivalent to the command options above:
<?xml version="1.0"?>
<ices:Configuration xmlns:ices="http://www.icecast.org/projects/ices">
  <Playlist>
    <File>/tmp/playlist.txt</File>
  </Playlist>

  <Execution>
    <Verbose>1</Verbose>
    <BaseDirectory>/tmp</BaseDirectory>
  </Execution>

  <Stream>
    <Server>
      <Hostname>olympus.local.net</Hostname>
      <Port>8000</Port>
      <Password>abcdef</Password>
      <Protocol>http</Protocol>
    </Server>

    <Mountpoint>/80s</Mountpoint>
    <Name>Local OGG Stream</Name>
    <Genre>80s Stuff</Genre>
    <Description>Good ol' pop, rock and jazz</Description>

  </Stream>
</ices:Configuration>
To have iceS read values from this file instead of the command line, simply tell it where to find the file, by using the "-c" option, as below:
$ /usr/local/icecast/bin/ices -c /usr/local/icecast/etc/ices.confFor more configuration options, take a look inside the sample configuration file included with the iceS distribution.
Facing The Music
Right, now that your server and streamer are talking to each other, and a stream is being broadcast to the world at large, there's only one question left: how do you tune in to it?
Well, the answer's pretty simple. All you need is a player capable of decoding Icecast streams, and you're golden. In our environment, we have successfully used Winamp 2.x and Windows Media Player with Icecast - you can obtain a list of other supported players from http://www.icecast.org/thirdparty.html
If you're using Winamp, tune into the stream by selecting the "Add URL" menu command and entering the server name, port and mount point, in the following format:
http://server:port/mountpoint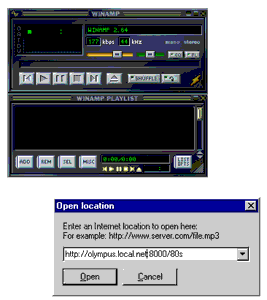
Using the example above, the URL would be
http://olympus.local.net:8000/80sWinamp should now connect to the server and begin decoding and playing back the stream.
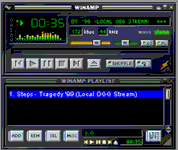
Sit back and enjoy the music - you've just set up your own little radio station!
Channeling The Energy
Now, how about adding a few more channels to the station?
You'll remember that, at the beginning of this tutorial, I told you that the icecast server could stream content from multiple source clients simultaneously, simply by placing each one at a different mountpoint. Well, that's how you create "channels" - simply create a playlist file for each "channel" and have iceS stream it to the server on a different mountpoint.
The following example illustrates, by creating three channels, one for 80s music, one for dance tracks and one for 60 rock'n'roll:
$ /usr/local/icecast/bin/ices -h olympus.local.net -p 8000 -P abcdef -F /tmp/80s.txt   -m 80s -g "80s Stuff" -d "Music from the 80s" -v -t http &

$ /usr/local/icecast/bin/ices -h olympus.local.net -p 8000 -P abcdef -F /tmp/dance.txt   -m dance -g "Dance!" -d "Get up and get movin'!" -v -t http &

$ /usr/local/icecast/bin/ices -h olympus.local.net -p 8000 -P abcdef -F /tmp/60s.txt   -m 60srock -g "60s Stuff" -d "Rock from the 60s" -v -t http &
You can now tune into the 80s music channel by pointing your audio player to
http://olympus.local.net:8000/80sthe dance channel by opening up
http://olympus.local.net:8000/danceand the 60s rock channel at
http://olympus.local.net:8000/60srockGo on - try it out for yourself and see!
Web World
Finally, what about the Web-based administration module I was touting so proudly earlier? Well, I wasn't lying - the icecast server comes with built-in support for Web-based administration of the server, allowing you to use a Web browser to view source client and listener statistics, kick source clients and/or listeners off the server and manipulate mountpoints. As of this writing, this module is fairly basic, but expect it to improve over time (or why wait? just roll your own admin module, it's pretty easy!)
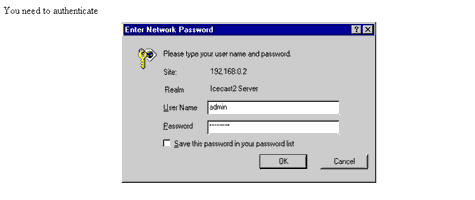
In order to access the Web administration module, start up your browser and point it to the hostname of your icecast server. For example, if your server is named "olympus.local.net" and is running on port 8000, you can access the Web based administration module by browsing to this URL:
http://olympus.local.net:8000/admin/At this point, you'll be asked for a user name and password. Enter the values you specified oh-so-long-ago in the icecast configuration file,
and you should be in. Here are some of the screens you might see:
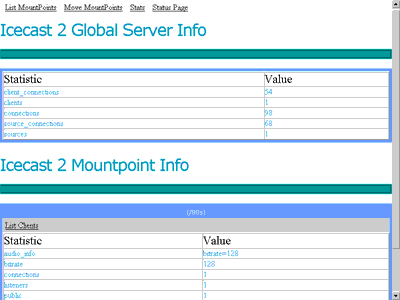
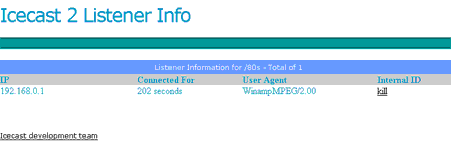
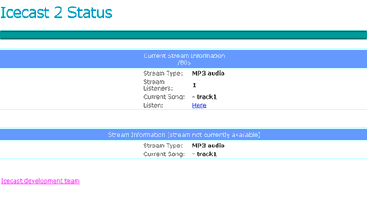
Go ahead and play with it - you're not likely to break anything serious!
If you're looking for tools to interface with the icecast server, either to manage playlists or control server variables, there are a number of free, open-source applications available to help you in this endeavour. Here's a list of the best ones:
Tunez, at http://sourceforge.net/projects/tunez/
DarkIce, at http://darkice.sourceforge.net/
Sphinxter, at http://freshmeat.net/redir/sphinxter/37244/url_homepage/sphinxter
Muse, at http://freshmeat.net/redir/musemp3streamer/6830/url_homepage/muse.html
Also take a look at these links, for more information on Icecast:
The official Icecast Web site, at http://www.icecast.org/
The Icecast FAQ, at http://www.icecast.org/faq.html
The Icecast manual, at http://www.icecast.org/documentation.html
The Icecast mailing lists, at http://www.xiph.org/icecast/list.html
Older Icecast releases, at http://www.icecast.org/releases/
And with that, I'm outta here. I hope you enjoy your Icecast experience, and that you have as much fun with it as I did writing this tutorial. Until next time...keep smiling!
Note: Examples are illustrative only, and are not meant for a production environment. Melonfire provides no warranties or support for the source code described in this article. YMMV!
This article was first published on18 Dec 2003.