Fear Factor
The thing about Zope is, everyone wants to use it, but most people don't know where to start.
Take, for example, something as simple as building a feedback form. For a PHP or Perl developer, this is a doddle, requiring no more than a couple hours of development time (OK, OK, a little more if it requires complex validation or processing). Building a feedback form in PHP or Perl is neither scary or intimidating; in fact, it's one of the most fundamental things a Web developer needs to know to consider himself even reasonably proficient in the language.
Put that same PHP or Perl developer on a Zope-based platform, however, and the sweat will really start trickling. Zope's object-oriented approach to everything tends to confuse even the most versatile PHP or Perl programmer, and you can expect that one hour to telescope into a couple of days, as our fearless programmer struggles to master the intricacies of Zope objects, variables and methods.
In case you ever find yourself in this situation, you're going to be glad you found this article. Over the next few pages, I'm going to give you a broad overview of the process of building and processing Zope forms, demonstrating how simple and painless the process really is.
I'll be assuming that you know the basics of Zope - variables, and the like - and that you have a Zope 2.50 system up and running. In case you don't, drop by http://www.zope.org/Documentation/nuser, get the skinny and then come back for the fireworks.
Making New Friends
We'll start with something simple, a form with three fields and a form processor that displays the data entered into the form.
The first step is to create a couple of DTML Document objects (via the Zope Management Interface, usually available at http://your_zope_server:8080/your_folder/manage) to represent these two items. I've called them Form and FormProcessor respectively; feel free to name them whatever you want.
First, let's look at the Form object:
<dtml-var standard_html_header>
<form action="FormProcessor" method="POST">

Species:
<br>
<input name="species">
<p>
Home planet:
<br>
<input name="planet">
<p>
Distance (light years) from Earth:
<br>
<input name="distance">
<p>
<input type="Submit" value="Beam Me Up, Scotty">
</form>

<dtml-var standard_html_footer>
This isn't very hard to read, even if you've never worked with Zope before. It's a standard HTML form, with DTML statements embedded within it (much like a PHP script, which has PHP commands embedded within the markup).
If you have some familiarity with Zope, you'll already know about the HTML header and footer objects; they are generic objects that can be used to place a standard header and footer on every page. Enclosed within these is a regular HTML form, albeit one which references another DTML Document when submitted. This DTML Document is named FormProcessor, and it's going to handle the task of processing the data entered into the form by the user.
<form action="FormProcessor" method="POST">
...
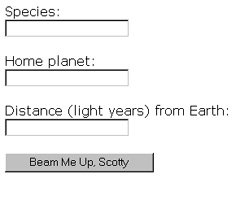
</form>Here's what the form looks like:
Driving Under The Influence
Now, how about that FormProcessor? Well, it's another DTML Document, and it looks like this:
<dtml-var standard_html_header>

Welcome to Earth, <b><dtml-var species></b> from the planet <b><dtml-var planet></b>.
<p>
How was your journey? Travelling <b><dtml-var distance></b> light years must be quite a shock to the system. Why don't you relax and have a drink?

<dtml-var standard_html_footer>
When the Form is submitted, the data entered into it comes to the FormProcessor as DTML variables, and can be displayed on the page simply by referencing the appropriate form variable. So, to display the contents of the field
<input name="species">in the Form object, I would use the code
<dtml-var species>in the FormProcessor object.
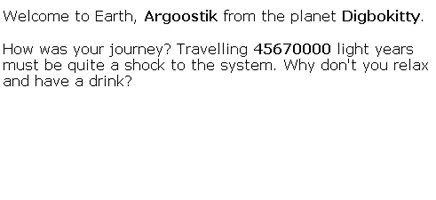
Here's what a submitted form looks like:
Stringing Things Along
Obviously, there's a lot more you can do with Zope than just this. One of the coolest things has to be the ability to enforce data types and checks on the data entered into a form. If you've ever had to code a form processor, this capability is sure to save you a couple of hours of work.
Let's see how it works, by modifying the Form object created previously:
<dtml-var standard_html_header>

<form action="FormProcessor" method="POST">
Species:
<br>
<input name="species:string">
<p>
Home planet:
<br>
<input name="planet:string">
<p>
Distance (light years) from Earth:
<br>
<input name="distance:int">
<p>
<input type="Submit" value="Beam Me Up, Scotty">
</form>

<dtml-var standard_html_footer>
In this case, I've specified that the first two fields must contain string values, while the third must contain an integer. Assuming, for example, that the user enters a string instead of an integer into the last field, Zope will halt form processing and display an error message. Here's what it looks like:
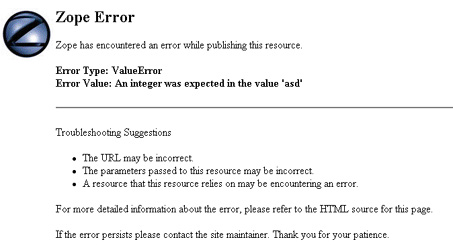
A little scary, but nevertheless effective in communicating the error. Obviously, you can customize this page to your own requirements.
A number of types can be enforced on form variables - here's a quick list:
"float" - a floating-point number;
"int" - an integer;
"long" - a long integer;
"string" -a character string;
"text" - a line-separated string;
"lines" - a list of values separated by lines;
"date" - a date/time value
You can enforce that a field typed as "string" be non-empty by using the "required" value in it. For example, the following code modifies the Form object above to require information on the home planet:
<dtml-var standard_html_header>

<form action="FormProcessor" method="POST">
Species:
<br>
<input name="species:string">
<p>
Home planet:
<br>
<input name="planet:required">
<p>
Distance (light years) from Earth:
<br>
<input name="distance:int">
<p>
<input type="Submit" value="Beam Me Up, Scotty">
</form>

<dtml-var standard_html_footer>
Running On Empty
Finally, the "ignore_empty" directive tells Zope to ignore the form variable (exclude it from the variable space) if it's left empty. Here's an example:
<dtml-var standard_html_header>
<form action="FormProcessor" method="POST">
Species:
<br>
<input name="species:string:ignore_empty">
<p>
Home planet:
<br>
<input name="planet:ignore_empty">
<p>
Distance (light years) from Earth:
<br>
<input name="distance:int:ignore_empty ">
<p>
<input type="Submit" value="Beam Me Up, Scotty">
</form>
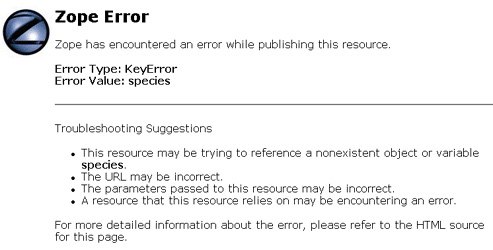
<dtml-var standard_html_footer>In this case, if any of the fields are left empty and the form is submitted to the FormProcessor object, the corresponding DTML variable will never come into existence. Consequently, the FormProcessor object (which, you will remember, references each of these variables) will raise a KeyError when it attempts to access this non-existent variable.
Here's what it looks like:
Don't like this? You can fix it by telling Zope what to do if it encounters a missing variable by adding the "missing" attribute to the variable call in the form processor. Take a look at the new, improved FormProcessor:
<dtml-var standard_html_header>

Welcome to Earth, <b><dtml-var species missing="Alien"></b> from the planet <b><dtml-var planet missing="Zorgo"></b>.
<p>
How was your journey? Travelling <b><dtml-var distance missing="so many"></b> light years must be quite a shock to the system. Why don't you relax and have a drink?

<dtml-var standard_html_footer>
The "missing" attribute sets a default value for the variable in the event that Zope cannot find it, in an attempt to avoid those ugly error messages.
In The Raw
In case you want to see what values are being passed back and forth between the Form and FormProcessor, you can simply display the contents of the REQUEST namespace. Take a look at the form processor below for an understanding of what this means:
<dtml-var standard_html_header>

<dtml-var REQUEST>

<dtml-var standard_html_footer>
Now, when you submit a form to this FormProcessor object, you'll see something like this:
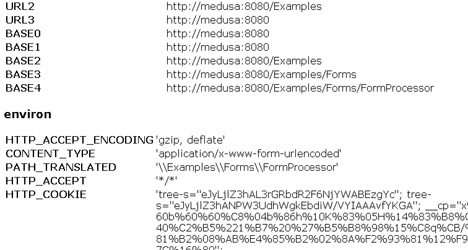
The REQUEST namespace contains a whole bunch of environment and Zope variables that you can use for your own dark purposes. These include, among others, the standard variables HTTP_USER_AGENT, HTTP_REFERER and PATH_INFO, Zope-specific variables like PUBLISHED, SERVER_URL, AUTHENTICATED_USER and URL0, and cookie and session data.
This ability to access form variables in this manner brings up another interesting item. Thus far, I've been creating individual Form and FormProcessor objects. However, it's also possible to create a combined object, simply by testing for the presence or absence of the "submit" variable.
In order to better understand this, create a new DTML Document named "DualPurposeForm" and add the following DTML code to it:
<dtml-var standard_html_header>

<dtml-if submit>

Welcome to Earth, <b><dtml-var species missing="Alien"></b> from the planet <b><dtml-var planet missing="Zorgo"></b>.
<p>
How was your journey? Travelling <b><dtml-var distance missing="so many"></b> light years must be quite a shock to the system. Why don't you relax and have a drink?

<dtml-else submit>

<form action="DualPurposeForm" method="POST">
Species:
<br>
<input name="species:ignore-empty">
<p>
Home planet:
<br>
<input name="planet:ignore-empty">
<p>
Distance (light years) from Earth:
<br>
<input name="distance:ignore-empty">
<p>
<input type="Submit" name="submit" value="Beam Me Up, Scotty">
</form>

</dtml-if>

<dtml-var standard_html_footer>
In this case, the DTML "if" test will first check to see if the "submit" form variable exists. If it does, it implies that the form has been submitted, and the second half of the script, the actual form processor, comes into play. If it doesn't, it implies that the form has not yet been submitted, and so the initial, empty form is displayed.
This technique makes it possible to reduce the number of objects used, and perhaps make your Zope object collection easier to handle.
There are a couple of other things you could do to the form object above. First, you could replace the object name in the form's ACTION attribute
<form action="DualPurposeForm" method="POST">with the special Zope variable "URL0".
<form action=<dtml-var URL0> method="POST">URL0 is a Zope variable which always holds the name of the current URL (you'll see it in the list of variables displayed within the REQUEST namespace). Using this built-in variable covers you in case you need to change the object name in future.
You might also want to wrap the "if" test within a namespace localizer - for example, <dtml-with> - in order to ensure that Zope checks the REQUEST namespace for the "submit" variable first, rather than any other namespace that exist. For more information on this, visit the documentation at http://www.zope.org/Members/michel/ZB/AdvDTML.dtml
You've Got Mail!
Finally, how about a complete example to wrap all this up? Here's the form:
<dtml-var standard_html_header>

<table border=0 cellspacing=5 cellpadding=5>
<form action="FeedbackFormProcessor" method="POST">
<tr>
<td valign="top">Name:</td>
<td><input name="name:string"></td>
</tr>

<tr>
<td valign="top">Email address:</td>
<td><input name="email:required"></td>
</tr>

<tr>
<td valign="top">Comments:</td>
<td><textarea name="comment:text" cols="30" rows="6"></textarea></td>
</tr>

<tr>
<td colspan=2 align=center><input type="Submit" name="submit" value="Send!"></td>
</tr>
</table>
</form>

<dtml-var standard_html_footer>
And here's what it looks like:
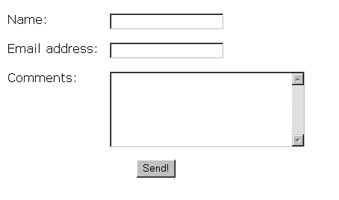
As you can see, this is a simple feedback form for a Web site. When a user submits it, the information entered into it should be automagically emailed to the site's Webmaster.
How is this done in Zope? Very simple. First, create a new Mail Host object (I've called mine "LocalRelay"), and assign it appropriate values for your SMTP server. Then, create a FeedbackFormProcessor, which uses this Mail Host object to send the contents of the form to a specified email address.
Here's the code:
<dtml-var standard_html_header>

<dtml-sendmail mailhost="LocalRelay">

To: webmaster@domain.com
From: <dtml-var email>
Subject: Feedback on <dtml-var SERVER_URL>

Name: <dtml-var name>
Email address: <dtml-var email>
Comment: <dtml-var comment>
--
URL: <dtml-var URL>
Remote address: <dtml-var REMOTE_ADDR>
User agent: <dtml-var HTTP_USER_AGENT>
</dtml-sendmail>

Your feedback was sent successfully. Thank you for your comments!

<dtml-var standard_html_footer>
In this case, the <dtml-sendmail> directive is used to tell Zope that the contents of the block are to be sent out as email via the specified Mail Host. You must ensure that the email message includes "To", "From" and "Subject" headers, or else either Zope or your mail server will barf. In addition to these three mandatory headers, you can also specify additional, optional headers, such as "Cc", "Reply-To" and so on.
Notice how I've included a few built-in variables in the email message. This is useful to provide the site's Webmaster with some additional information on the client used to send the feedback.
In case you have difficulty configuring a Mail Host, you can also use this alternative construction:
<dtml-sendmail smtphost="my.mail.server" port="25" >
...
</dtml-sendmail>
Once the email message has been sent, a message is displayed to the user confirming message delivery.
If you're going to be using a lot of feedback forms, you might want to consider making the recipient email address a property, so that you can refer to it as a variable rather than hard-wiring it into the DTML Document code itself.
Endgame
And that's about it for the moment. I hope you found this interesting, and that it made Zope a little less intimidating. I'll be back soon with more on the topic...but until then, amuse yourself with these links:
The official Zope Web site, at http://www.zope.org/
Zope documentation, at http://www.zope.org/Documentation
The Zope Book, at http://www.zope.org/Members/michel/ZB
A discussion of Zope form variable types, at http://www.zope.org/Members/Zen/howto/FormVariableTypes
See you soon!
Note: All examples in this article have been tested on Linux/i586 with Zope 2.5. Examples are illustrative only, and are not meant for a production environment. Melonfire provides no warranties or support for the source code described in this article. YMMV!
This article was first published on22 Feb 2002.