Still Waters Run Deep
Unless you've been cryogenically frozen for the last twenty years, you probably already know what Apache is. It's the planet's most popular Web server, with a humongously-high number of Web sites relying on it to serve up content in a reliable and efficient manner. It has an enthusiastic fan following, an active development community, and the love and loyalty of millions of Webmasters all over the planet.
The cool thing about Apache, though, is that it's not just a Web server. It can do lots of other things too - and of its more interesting (though less well-known) capabilities includes the ability to act as a proxy server for both HTTP and FTP connections over a network.
If you didn't know about this, but are intrigued by the possibilities it opens up, or if you just want to take your Apache skills to the next level ("hey, Joe, did you know that you could use Apache to restrict certain machines on your network from accessing playboy.com?"), you've come to the right place. Over the next few pages, I'll be exploring Apache's proxy module, guiding you through the process of installing, configuring and using it. Keep reading.
A Little Drool
First of all, the basics. What's a proxy, and why do you care?
A proxy is a piece of software that supports sending and receiving data on behalf of another application. It's an intermediate layer on your network that receives requests from within the networks, forwards them to the appropriate host, reads the response, and sends the response back to the requesting host or application within the network.
By functioning as a gateway to the public Internet, a proxy makes for more secure networks, and also allows multiple hosts on a network to share a single public IP address. So, if you have an office network consisting of multiple workstations, but only a single Internet connection, you can use a proxy to provide Internet access to all the workstations using the single IP address and single connection.
Since a proxy effectively carries the weight of serving all Internet traffic for a network, it can also be used to do a couple of other things. The first (and most interesting) is that it can substantially speed up your Internet activity by caching, or locally saving, copies of frequently-accessed Web pages, and using these cached copies to serve client requests. This reduces latency, cuts down on Internet connectivity charges, and results in a more positive user experience - all usually considered good things.
A proxy can also be used to monitor Internet traffic flowing in and out of a network, logging all requests in order to gain a better understanding of how the Internet is being used; this data can be very useful, especially in corporate environments. And in the event that the data analysis reveals that most of the employees are goofing off, wasting time and Internet packets on online comic strips or mind-numbing MUDs, a proxy can even be configured to block access to certain sites, or block certain workstations for accessing the Web.
If you're a network administrator, the thought of all this power probably has you drooling. Wipe it up, and let's get started.
Getting Started
Obviously, in order to do anything constructive with Apache, you need a copy of the source code. Drop by http://httpd.apache.org/ and get yourself the latest version (this article uses both Apache 1.3 and Apache 2.0).
Once you've got a source code archive, uncompress it into a directory on your system,
$ cd /tmp
$ tar -xzvf httpd-2.0.36.tar.gz
and run the "configure" script in the newly-created directory (for Apache 1.3):
$ ./configure --enable-module=proxyIf you're using Apache 2.0, you should use this instead:
$ ./configure --enable-proxy --enable-proxy-ftp --enable-proxy-http --enable-cache --enable-disk-cacheOnce the source tree has been prepped, you can compile and install Apache with a quick
$ make
$ make install
Apache should get installed to the default location of /usr/local/apache, unless you specified a different location by adding the "--prefix" parameter to the "configure" script.
If all goes well, you should now have a properly-compiled Apache Web server installed on your system. Check to make sure that the proxy module has been included in the build via a quick scan of the output of "httpd -l".
$ /usr/local/apache/bin/httpd -l
Compiled-in modules:
  http_core.c
  mod_env.c
  mod_log_config.c
  mod_mime.c
  mod_negotiation.c
  mod_status.c
  mod_include.c
  mod_autoindex.c
  mod_dir.c
  mod_cgi.c
  mod_asis.c
  mod_imap.c
  mod_actions.c
  mod_userdir.c
  mod_alias.c
  mod_access.c
  mod_auth.c
  mod_proxy.c
  mod_setenvif.c
All that's left is to configure the proxy. Let's look at that next.
Passing The Packets
Apache can function as both a "forward proxy" and a "reverse proxy". A forward proxy accepts client requests, forwards them to the Internet, and sends the responses back to the requesting client. A reverse proxy, on the other hand, provides an easy way to remap external URLs such that they appear to belong to the same domain space as the proxy itself, and to provide enhanced caching facilities at the proxy level (if that didn't make much sense, don't worry - I've explained it in detail a little further along).
Pop open the Apache configuration file, "httpd.conf", and add the following lines to it (for Apache 1.3):
<IfModule mod_proxy.c>

    ProxyRequests On

    <Directory proxy:*>
        Order deny,allow
        Deny from all
        Allow from 192.168.0.0/255.255.255.0
    </Directory>

</IfModule>
If you're using Apache 2.0, you should use this instead:
<IfModule mod_proxy.c>

ProxyRequests On

<Proxy *>
    Order deny,allow
    Deny from all
    Allow from 192.168.0.0/255.255.255.0
</Proxy>

</IfModule>
Here, the
ProxyRequests Ontells Apache to activate its proxy services. It is followed by a
<Proxy>
...
</Proxy>
or
<Directory>
...
</Directory>
block, which contains rulesets for determining which clients can access these services. These are similar to firewall rules, which you may be familiar with already.
  <Directory proxy:*>
        Order deny,allow
        Deny from all
        Allow from 192.168.0.0/255.255.255.0
    </Directory>
Note that the last line within the block specifies the IP addresses of clients allowed to use the proxy. In the example above, I've specified all clients on the 192.168.0.* network; you can just as easily restrict this to a list or range of specific IP addresses.
Once that's done, shut down and restart the server.
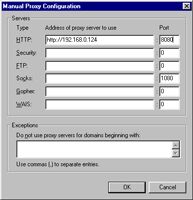
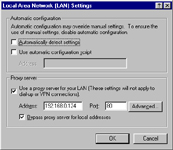
$ /usr/local/apache/bin/apachectl restartNext, you need to tell clients on the network about the proxy server. In most cases, this involves popping open the client's configuration and setting the host name or IP address of the machine running the proxy server. Assuming that the proxy server is running on the machine identified by the IP address 192.168.0.10, here's what the configuration looks like in Internet Explorer,
and in Netscape Communicator.
Once the client configuration is complete, attempt to access an Internet resource - the client should make the request via the proxy (which should, obviously, be connected to the Internet), receive a response and display it to the user.
You can verify that the request is in fact being handled via the proxy by checking Apache's log files - if, for example, I used a browser on a networked machine to access the Melonfire Web site, here's what I'd see in the server logs:
192.168.0.143 - - [23/May/2002:15:35:52 +0530] "GET http://www.melonfire.com/images/account_h.jpg HTTP/1.0" 200 5118
192.168.0.143 - - [23/May/2002:15:35:53 +0530] "GET http://www.melonfire.com/images/community_h.jpg HTTP/1.0" 200 6772
192.168.0.143 - - [23/May/2002:15:35:56 +0530] "GET http://www.melonfire.com/images/contact_h.jpg HTTP/1.0" 502 519
192.168.0.143 - - [23/May/2002:15:36:02 +0530] "GET http://www.melonfire.com/images/logo1.jpg HTTP/1.0" 200 6988
192.168.0.143 - - [23/May/2002:15:36:02 +0530] "GET http://www.melonfire.com/images/teasers/3.jpg HTTP/1.0" 502 519
192.168.0.143 - - [23/May/2002:15:36:04 +0530] "GET http://www.melonfire.com/images/company_n.jpg HTTP/1.0" 200 6298
192.168.0.143 - - [23/May/2002:15:36:05 +0530] "GET http://www.melonfire.com/images/community_n.jpg HTTP/1.0" 200 5971
192.168.0.143 - - [23/May/2002:15:36:05 +0530] "GET http://www.melonfire.com/images/go.jpg HTTP/1.0" 200 7002
192.168.0.143 - - [23/May/2002:15:36:06 +0530] "GET http://www.melonfire.com/images/services_n.jpg HTTP/1.0" 200 5817
192.168.0.143 - - [23/May/2002:15:36:07 +0530] "GET http://www.melonfire.com/images/account_n.jpg HTTP/1.0" 200 3820
Wheat And Chaff
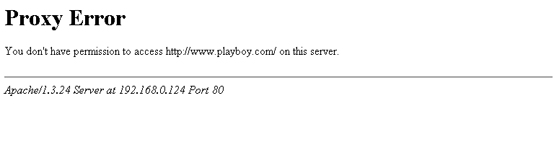
The ability to have all HTTP requests directed outside the network going through a single proxy, which is completely under your control, opens up some interesting possibilities. One of the most common ones involves using the proxy to filter out and reject requests for certain "bad" sites. Here's an example, which uses the very powerful ProxyBlock directive to reject all requests for the Playboy Web site.
ProxyBlock .playboy.comYou can specify multiple sites by separating them with spaces.
ProxyBlock .playboy.com .badboy.comYou can block all sites in one swell foop with
ProxyBlock *Obviously, this is kinda pointless, especially after all the trouble you've gone to to set up the proxy in the first place - but feel free to try it, if only for the experience.
Any attempt to access one of these blocked sites will fail, with Apache returning a default error page to the client. Here's what it looks like:
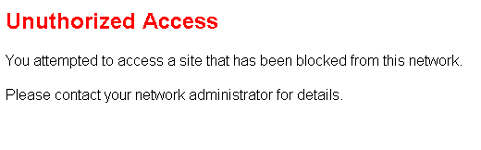
Obviously, you can customize this page - simply specify the location of a different error page for all HTTP 403 errors, via the ErrorDocument directive.
ErrorDocument 403 /error403.htmlHere's an example of a custom error page, specified using the technique above:
Going Backwards
You can also have Apache work as a reverse proxy, allowing you to create "shortcut" URLs which appear to be local to the proxy server, yet actually point to external Web resources. Most of this is accomplished via the ProxyPass directive, which requires you to specify both the local path and the remote URL.
Here's an example:
ProxyPass /melonfire/ http://www.melonfire.com/In this case, any request for the URL
http://proxy/melonfire/will be automatically forwarded (via the proxy, naturally) to
http://www.melonfire.com/Cache Cow
Another good reason to use a proxy is to speed up the delivery of frequently-accessed Web pages to connecting clients. Apache comes with a fairly good proxy caching feature, which can be used to store Web pages on the server and use these locally-cached copies to serve client requests.
In order to enable this cache, add the following lines to your Apache 1.3 configuration file:
CacheRoot "/usr/local/apache/proxy"
CacheSize 5
CacheGcInterval 4
CacheMaxExpire 24
CacheLastModifiedFactor 0.1
CacheDefaultExpire 1
NoCache yahoo.com
Most of these are fairly self-explanatory - the CacheRoot directive sets the directory where cached files will be stored, while the other directives specify things like maximum cache size and maximum cache flush interval. It's also possible to exclude certain Web sites from being cached, via the NoCache directive.
The corresponding directives for Apache 2.0 are:
<IfModule mod_disk_cache.c>
CacheRoot "/usr/local/apache/proxy"
CacheSize 500
CacheDirLevels 5
CacheDirLength 3
</IfModule>
Using a cache can speed up browsing on your network, as the server can use cached copies to provide faster response times to connecting clients.
Endzone
If you're in charge of running a small office network, you might find Apache's built-in proxy server and caching features fairly useful, especially if all you're looking for is a simple, efficient solution.
The proxy server is great for enabling Internet connection sharing across multiple networked workstation, and can also add to your peace of mind by providing an additional layer of security to your network. It also provides you with more control over Internet usage, allowing you to restrict access to "bad" sites, and control which workstations have access to the Internet. Finally, its logging facilities allow you to monitor Internet usage, providing you with useful feedback on the performance of your network.
The caching features can also come in handy, especially if your users tend to visit the same set of sites on a regular basis. By using the cached copies, Apache's proxy server can reduce bandwidth consumption, enhance user perception of network performance, and reduce Internet costs.
Of course, when all is said and done, the Apache proxy server will always play second fiddle to the Web server, which still gets the lion's share of the attention. If you're looking for a practical, robust and efficient solution, and your requirements aren't too complicated, Apache's proxy server will probably work for you. If, on the other hand, you're looking for more advanced features (like access control lists, more detailed logging and so on), you should consider using squid, which has to be one of the most powerful, full-featured proxy servers out there today.
I'll be discussing squid in a separate article soon - but, until then, feast on the following links:
Apache 1.2 documentation for mod_proxy, at http://httpd.apache.org/docs/mod/mod_proxy.html
Apache 2.0 documentation for mod_proxy, at http://httpd.apache.org/docs-2.0/mod/mod_proxy.html
An introduction to Web caching, at http://www.web-caching.com/mnot_tutorial/
An introduction to squid, at http://linux.oreillynet.com/pub/a/linux/2001/07/26/squid.html
See you soon!
Note: All examples in this article have been tested on Linux/i686 with Apache 1.3 and Apache 2.0. Examples are illustrative only, and are not meant for a production environment. Melonfire provides no warranties or support for the source code described in this article. YMMV!
This article was first published on07 Jun 2002.