Coming Up Next...
The last time out, I took you on a guided tour of the Flash toolbox, and showed you how to use the various drawing and painting tools available in Flash 5.0. This time, I'll be getting up close and personal with some of the other things you need to know before you start animating - things like symbols, frames and the library. I'll also explain the various types of animation available in Flash, and walk you through the process of creating and exporting a movie to your Web site.
Translation: don't go anywhere!
Putting Together The Timeline
Now, this may come as a surprise to those of you new to the world of animation, but animation doesn't just spring into existence. An animation sequence is created by stringing together multiple static images, and displaying them in rapid succession. If they are displayed quickly enough, the illusion of movement is enough to fool the human eye.
Flash animation works in much the same way. A Flash movie is composed of multiple frames (organized across different "layers"), which you can view, edit, delete and otherwise manipulate to your heart's content. This manipulation takes place via the Timeline, which is by far one of the most-used components of the Flash work area.
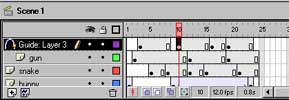
When you first start Flash up, the Timeline typically appears above the main work area (you can alter its position if you like, though why you would want to is a mystery to me.) If you take a close look at it, you'll see that it's actually composed of two different things - layers and frames. The layers run vertically along the left side of the Timeline, while the frames within each layer run horizontally across the timeline, from left to right.
One Big Mac And Fries, To Go!
Layers in Flash can best be described as a method of organizing elements of a...nah, scrap that. In order to understand the concept of a Flash layer, you need simply look at your average Big Mac. A Big Mac is composed of layers - there's the meat layer, followed by a strip of lettuce, followed by a layer of tomatoes and onions, followed by a slice of cheese, followed by a...oh, you get the idea.
Each layer can be removed and manipulated independent of the other layers. This is true of both Flash layers and a Big Mac.
A new Flash movie contains a single layer; you can add as many as you like. You can also copy, rename and delete layers. In order to modify a layer, you need to first activate it by clicking once on it (a pencil icon will appear on the layer). Once the layer is active, you can draw, paint and manipulate objects on it.
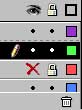
Layers are transparent by default, and you can use the three control buttons on each layer to alter layer visibility, "lock" the layer to prevent changes from being made to it, and display the elements on a layer as outlined (rather than filled) objects.
The icons at the bottom left of the Timeline are used to insert new layers, and delete existing layers.

Framed!
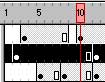
Each layer is composed of one or more frames, which come in two types - the "regular" variety and the "keyframe" variety. A keyframe is a frame in the animation at which some change occurs - for example, movement of an object from one point to another, or a shape morph.
You can distinguish between keyframes and regular frames by the black dot that appears at the bottom of every keyframe.
Keyframes can be added at any point in the Timeline via the Insert->Keyframe command on the shortcut menu. Regular frames following a keyframe will be identical to that keyframe.
Just like layers, you can copy, move and delete frames and keyframes. When you delete a keyframe, the frames around it remain unchanged. You can convert a keyframe to a regular frame via the Clear Keyframe option on the shortcut menu that appears when you click it.
Speaking In Symbols
One of the most interesting things about Flash is its use of "symbols".
In Flash jargon, a symbol is an object which can be re-used over and over again at different points in your movie. Each "instance" of the symbol can be manipulated independent of the original symbol, and of other instances of the same symbol in the movie - however, since you're using instances of the same symbol over and over again, the size of your Flash file remains unaffected.
In other words, symbols are a Good Thing and should be used wherever possible - especially if you find yourself using the same object(s) over and over again in a single movie.
A symbol can be of three types - graphic, button or movie clip. For the moment, I'll be dealing only with graphic symbols - the others will be covered as we progress through this tutorial.
Once a symbol is created (I'll be showing you how to do that as well in a bit), you can edit it, just as you would any other object, or create multiple instances of it for use in your movie. You can manipulate instances of a particular symbol without affecting the parent symbol; however, changes made to the parent symbol will affect child instances.
You can create as many symbols as you like for a single Flash movie - and Flash even offers you a mechanism to store and view all the symbols available in the current movie through its Library tool. The Library can be activated via the Window->Library menu, or with the keyboard shortcut Ctrl-L.
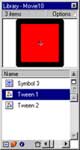
The Library allows you to preview each symbol, and can provide you with information on the symbol name and type, the number of times the symbol has been used so far, and the date on which it was last edited. It also allows you to categorize symbols into folders for easy access, in a manner similar to the Windows Explorer. Libraries can be shared between different Flash movies, and Flash also comes with a number of built-in libraries containing frequently-used symbols.
Lights, Camera, Action!
Now that you know the theory, it's time to put it into practice. Over the next few pages, I'm going to walk you through the process of creating a simple Flash movie, exporting it, and embedding it in a Web page. With the exception of the technique used to create the animation, this is the typical process you would use to create any Flash movie.
If you haven't already done so, start Flash with a new movie. Pop open the Modify->Movie box, and define attributes for the movie you're about to create; this includes attributes like movie width and height, background colour and frame rate.
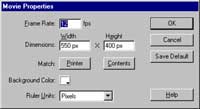
For this next example, select a width and height of 300x300 pixels. Leave everything else the way it is.
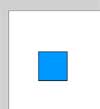
Back on the Stage now. Select frame #1 on layer 1 and then draw a square box in the work area. Fill it with a colour you like using the Paint Bucket Tool.
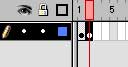
Next, select frame #2 and insert a new keyframe via the shortcut menu. Notice how the playhead (the red bar on the top row of the timeline) moves to frame #2, indicating that frame #2 is now the active frame.
Select the box you just drew and move it a few pixels to the right.
Repeat this process for frames #3 through to #5.
Now, at frame #6, insert a new keyframe, and move the square a few pixels down. Repeat this process for frames #7 through #10.
At this point, you've created your first animation sequence - you just don't know it yet. To test it, select Control->Play, or tap the Enter key. Flash will play the animation clip for you by displaying each frame in succession - you should see something like this:
Note that you can loop the clip via the Control->Loop Playback command.
At this point, you should know that what you've just created is a traditional frame-by-frame animation, in which every single frame is a keyframe. This is not a technique you'll be using very often, since Flash comes with powerful "tweening" functions that can automatically generate many of the in-between frames of an animation clip. Tweening, together with other animation tips and tricks, will be covered in future articles.
Now, let's add something else to this movie. Create a new layer via the Insert Layer button (bottom right of the timeline) and name it "dot" by double-clicking on the pencil icon (while you're at it, change the name of Layer 1 to "square" as well). Select frame #1 on the new layer, and draw a circle in the top right corner with the Circle tool.
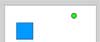
Next, select frame #2, select the circle you just created with the Arrow tool and move it to another random position on the Stage. Repeat this process for frame #3 through #10 on layer "dot". When you play the clip, you'll now see something like this:
Yes, it will give you a headache if you watch it for too long.
Post-Production
So that's your basic animation. It ain't too impressive - but don't worry, we'll fix that as we move along and you learn new animation techniques. Now let's quickly run through the process of what happens once your Flash movie is complete and you want to embed it in your Web page.
Once you've finished working on the movie, you need to export it as an SWF file. You can do this through the File->Export Movie dialog.
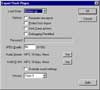
For the moment, leave everything as it is - the default settings are fine for most cases - and hit OK. Flash will save your movie as a .SWF file, ready to be embedded into your Web page.
Now, insert the following lines of code into your HTML page:
<OBJECT classid="clsid:D27CDB6E-AE6D-11cf-96B8-444553540000"
codebase="http://download.macromedia.com/pub/shockwave/cabs/flash/swflash.ca
b#version=5,0,0,0"
 WIDTH=300 HEIGHT=300>
<PARAM NAME=movie VALUE="x2.swf">
<PARAM NAME=quality VALUE=high>
<PARAM NAME=bgcolor VALUE=#FFFFFF>
<EMBED src="x2.swf" quality=high bgcolor=#FFFFFF  WIDTH=300 HEIGHT=300
TYPE="application/x-shockwave-flash"
PLUGINSPAGE="http://www.macromedia.com/shockwave/download/index.cgi?P1_Prod_
Version=ShockwaveFlash"></EMBED>
</OBJECT>
Alternatively, you can have Flash perform the above process for you automagically - select the File->Publish menu command, and Flash will create an HTML template containing the code you need.
The Publish menu command lets you do a lot more than just create HTML templates - you should play with it to see the various options you have available to you.
Triangulation
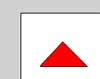
And finally, a quick illustration of how you can create and use symbols. Open up a new Flash movie, and use the line tool to create a triangle. Fill it with a colour.
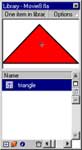
Now select it and use the Insert->Convert To Symbol command to convert your triangle to a symbol (or tap the F8 key). You'll be asked to enter a name and behaviour for your symbol; since this symbol will be used as a static object, select "Graphic" as the behaviour, and name it "triangle". You should now be able to see your symbol in the Library - you can check this by tapping Ctrl-L.
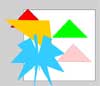
Now, with the Library window active, drag your symbol from the Library and drop it into your work area. Do this until your work area looks something like this:

Each of the objects you see is an "instance" of the symbol - these instances can be modified without affecting the parent symbol. To modify an instance, select it and use the Modify->Instance menu item to display the Instance tool panel. From this panel, you can modify certain characteristics of that particular instance of the symbol - in particular, the Effects panel allows you to alter the colour, transparency and brightness of the selected instance. You can also use the Modify->Transform menu items to scale, rotate, skew and flip the instance of the object.
After you've finished futzing around with the various triangles, you might end up with something like this:

Again, if you take a look at the Library, you'll see that the original symbol is untouched - it's only the instances which have changed.
If, however, you'd like your changes to apply to each and every instance of a symbol, you will need to make changes to the symbol itself. You can do this by right-clicking the symbol in the Library and picking the Edit option, or by clicking the Edit Symbols button on the top-right corner of your screen.

Flash will drop you into symbol-editing mode, where you can edit the shape, size and other attributes of the symbol. Once you're done, you can return to the work area by clicking the Edit Scene button at the top right corner of your screen.
If you made any changes to the symbol while in symbol-editing mode, those changes will be immediately reflected in the symbol instances on the Stage. As an example, try scaling your triangle to twice its size and return to the Stage - you'll see that the symbol instances have also doubled in size.
Note that some attributes of the instance may not change - the changes that you have made to a specific instance will be retained wherever possible. In the example above, though the size of each instance changes when the size of the symbol changes, the per-instance colour and shape settings remains the same.
And that's about it for this week. In the next article, I'll be showing you how to use Flash's tweening capabilities in conjunction with symbols and instances to create simple motion and shape morphs. See you then!
Note: All examples in this article have been tested on Macromedia Flash 5.0. Examples are illustrative only, and are not meant for a production environment. YMMV!
This article was first published on14 Dec 2000.