The Popular Choice
Recently, I put together a Web site, plugged in some interesting content, and (against all my expectations) the public actually liked it. People started telling each other about it, and visiting it again and again. Which was great for my ego, but really hard on my wallet - after the first month, I was sent a humongous traffic bill by my Web hosting company.
I had to think of some way of subsidizing the costs of my Web hosting program. The traditional route - signing up for a banner exchange program - beckoned, but I didn't really relish the thought of spending the days counting all the cents that came my way. So I thought of making things more interesting - managing the show by myself and pocketing all the dollars (not cents) without having to share them with anyone.
This led to a simple mandate - find a simple, easy-to-use, effective banner management application. I went straight to Google.com for the answer, and immediately came across the very popular phpAdsNew application. A quick review revealed that this application had matured from a primitive banner management application to a sophisticated piece of software suitable for use on any large portal. Only one catch - the complex marketing terms and wealth of options left me a little dazed, and I thought I'd keep looking to see if I could find something a little simpler...
I got lucky (just like my Web site) and came across phpBanner.
Start Me Up
phpBanner is a simple, no-nonsense banner management and tracking system for Web sites. It allows Web site administrators to manage advertisers and banners on the pages of a Web site, display them in a random or pre-defined arrangement, and track clicks on each. And it was simple to use - just read the single-page installation and instruction guide, and you're on your way!
The first thing is to make sure that you have everything you need for a successful installation of phpBanner. Typically, you'll need a PHP-compliant Web server (I'm using Apache), and a MySQL database server. Most Web hosting providers already offer these three components; however, in case yours doesn't, you can get Apache from http://www.apache.org/, PHP from http://www.php.net/ and MySQL from http://www.mysql.com/.
Once you've got all three packages configured and installed, download a copy of phpBanner from the official Web site at http://product.cybergl.co.id/dev/version.php?cmd=browse&product_id=3, and uncompress it to a location under your server root.
$ tar -xzvf phpBanner_0.0.2.tar.gzNext, create a MySQL database to store all the application information. Drop to a command prompt, and start up the MySQL client.
$ mysql
Welcome to the MySQL monitor.  Commands end with ; or \g.
Your MySQL connection id is 7311 to server version: 3.23.39

Type 'help;' or '\h' for help. Type '\c' to clear the buffer.

mysql>
Create a new database for the application (I've called mine "phpbanner").
mysql> CREATE DATABASE phpbanner;With the database created, it's time to set up all the required tables. This isn't as hard as it sounds - the phpBanner distribution comes with a single SQL file, "phpBanner.sql", which contains all the SQL commands needed to set up the application's database tables. All you need to do is execute these commands via the MySQL's server's client program.
$ mysql -D phpbanner -u root -p < /usr/local/apache/htdocs/phpbanner/phpBanner.sqlOnce the tables have been created, you need to set some configuration parameters so that the application knows where to find the database. Locate the "config.php" file in a folder named "require/" in the root directory of the application. Pop it open it in your favourite text editor and modify the contents so it looks like this:
#--------------------------------------- database configuration

$db_user= "phpbanner";
$db_pass= "phpbanner";
$db_name= "phpbanner";
$db_host= "localhost";

#--------------------------------------- tables configuration

$tbl_country    = "country";
$tbl_client= "banner_client";
$tbl_banner = "banner_data";

#--------------------------------------- path configuration

$rootpath= "/usr/local/apache/htdocs/phpbanner/";   #change this to fit your environment
$imagepath  = "$rootpath/images";
$uploadtempdir= "/tmp";
$clientpath = "$rootpath/client";   #you must set appropriate permission for write access to this directory
$reqpath= "$rootpath/require";
$incpath= "$rootpath/include";

#---------------------------------------url configuration

$rooturl  = "http://www.mysite.com/phpbanner";
$imageurl   = "$rooturl/images";
$adminurl   = "$rooturl/admin";
$clienturl= "$rooturl/client";
Most of these parameters are self-explanatory - the first set of parameters deals with the credentials required to access the database, the second set deals with the tables used by the application, the third set sets the location of the application's file paths and the fourth section contains the URL parameters required to access the application from a browser.
Remember to create a MySQL user and password matching the above credentials if it does not already exist, else the application will pop up lots of "Access Denied" messages.
Once you've made the necessary changes, save the file, and attempt to access the application URL through your browser. If phpBanner has been successfully installed and configured, you should see something like this:
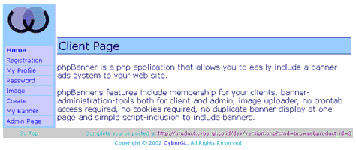
Aaaaaand you're done! Flip the page to find out how you can begin using the application.
Client Server
phpBanner consist of two main sections - a client interface and an administration module. The client interface allows clients to manage their own banners, while the administration module allows the site administrator(s) to manage client accounts, view and delete banners, and perform other administrative tasks.
Now that the application is functional, it's time to start adding clients to it (in case you're wondering, these are the clients who pay you to advertise on your site, not the browsers people use to see it). You can use the "Registration" link on the index page to register your clients (or even ask them to do it themselves). Here's what the registration page looks like:

Once you sign a client up and create an account, you also need to jump through one more hoop - enabling the client's account so that he or she can begin uploading banners to your site. If you're the only person creating the accounts, this step is redundant; however, in a system where each client registers themselves, this approval step helps to weed out unwanted/false registrations and provides the administrator with a degree of control over the system.
To enter the administration module, use the "Admin Page" link on the main menu:
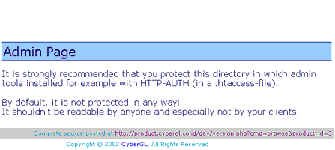
Quick note here: since this administration module is "open" to all users by default, you should make it a point to secure it using HTTP authentication at installation time itself. Not doing so allows any of your users access to privileged administrative functions.
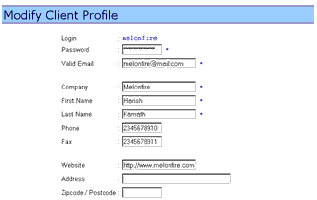
Use the "Client" link to get to the Client Manager, where you'll see a list of all the clients who've registered. This module allows you to edit the details provided at the time of registration, delete unwanted registrations and view the files uploaded to the application by each client (more on this last feature as we proceed). For the moment, click on the "Edit" link next to a client name and when you get the client registration form, simply change the "Active" parameter (near the end of the page) to read "enable".
Behind the scenes, phpBanner activates the client account and also automatically creates a directory on the server to store the client's banners and images.
Of Pictures And Words
Once a client account has been activated, he or she can easily access the application and modify both user profile and password using the "My Profile" and "Password" options that appear in the menu. However, clients will usually be more interested in the "Image" and "Create" menu options, as these are probably the only ones that they will use on a regular basis. But before I get into the nitty-gritty of these features, a quick explanation of how the system functions.
The process of adding a new banner to the site is fairly well defined, and it looks like this:
Step 1: The client uploads an image to the server.
Step 2: Next, he or she create a banner and associates any one of the images previously uploaded with the new banner.
Step 3: The administrator "enables" the banner, and also defines hits, clicks and keywords for the banner (more on this later).
Begin by selecting the "Image" link and logging in. You should now see something like this:
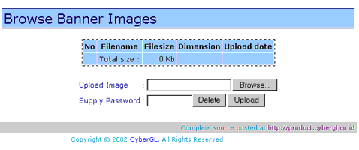
As you can see, this screen has it all: you can view a list of existing images, upload a new image, and delete existing images.
When you upload an image, it is always placed in the directory specially created for the client. If you want a quick preview, simply click the corresponding file name in the listing above and you'll be able to see what you just uploaded.
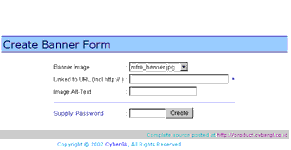
Right, now that the image has been uploaded, the next step is to create a banner associated with it. Click the "Create" menu item and log in again to see this:
If I can take a minute out to gripe here - one strange and unnerving feature of this application is the lack of session-based user authentication. This means that every action has to be validated with a password, over and over again - an extremely irritating problem that can easily be rectified by adding PHP session support to the code. Hopefully, this will be fixed in future versions of the application.
Once again, this easy-to-use screen has it all: the list of uploaded images in a neat little drop-down box, a text box to enter the URL that the banner points to, another text box to enter an image label (useful for text-only browsers and Web spiders). The client can add as many banners as needed - using the same image also if required - for different URLs.
Hits And Misses
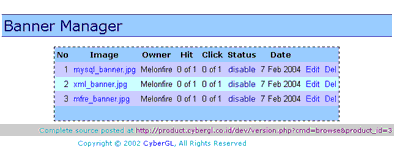
Once your customers have diligently uploaded their images and created their banners, you need to activate them (after you've got their money, of course!) So click on the "Admin Page" link, enter your password (you did add authentication to this page, didn't you?) and then select the "Banner" menu item.
If all goes well, you will see a neat listing of all the banners that have been uploaded by your client(s) to the site, as below:
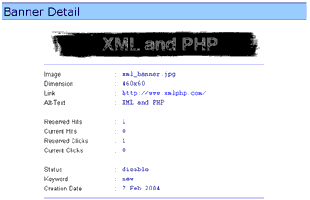
Click the name of the banner image and the following screen gives you more information about it:
Once you have checked that the client as well as the banner are authentic, go back to the listing screen and click the "Edit" link next to the banner. You'll be taken to the "Modify Banner" screen, which looks like this:
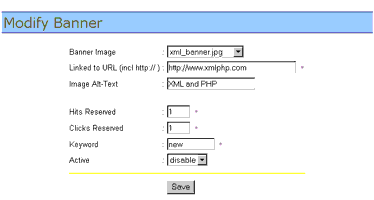
The "Keyword" value allows you to specify a word to be associated with the banner. As you will soon see, this is useful when it comes to displaying custom banners at specific locations on your site.
The "Hits Reserved" value represents the number of the times that the selected banner will be displayed on your site, while the "Clicks Reserved" parameter allows you to decide the number of clicks on the banner. How do these work? Simple - the banner will automatically be disabled once it exceeds the values specified for both the "Hits Reserved" and "Clicks Reserved" parameters. So, if you have set a banner to 10 hits but 25 clicks, the banner will continue appearing until it receives 25 clicks. Keep this in mind when you decide the values for these parameters.
Once we are done with these banner-specific parameters, use the "Active" flag to enable the banner and allow it to be displayed on your site. And yes, you can turn off a banner at any time by just setting this value to "disable".
Hooking Up
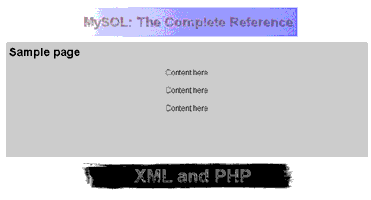
Once all the clients and banners are set up, all that's left is to add the phpBanner hooks to your Web pages so that the banners start appearing. In order to better understand this, consider the following simple HTML page:
<html>
<head>
<basefont face="Arial">
</head>

<body>

<table height="100%" width="100%" border="0" cellspacing="5"
cellpadding="5"> <tr>
    <td align="center">Ad goes here</td>
</tr>
<tr>
    <td height="100%" width="100%" valign="top" bgcolor="silver"
align="left">
    <h2>Sample page</h2>
    <center>
    Content here
    <p>
    Content here
    <p>
    Content here
    <p>
    </center>
    </td>
</tr>
</table>

</body>
</html>
Now, let's suppose I want to add a banner to this page. I've got my phpBanner all set up with client information and a bunch of banners. The first step, then, is to include some required files at the top of my HTML (now PHP) page.
<?php
require("/www/htdocs/phpbanner/require/config.php");
require("/www/htdocs/phpbanner/require/banner.php");
?>
Note the use of the complete path to the phpBanner application.
Next, I need to use the phpBanner-supplied get_banner() function to actually display a banner. This function takes two arguments: the "key" that decides how a banner is to be selected from the pool of available options, and a "value" to be used when performing the selection.
The first argument to get_banner() can be any one of "client" (select banners by client ID), "keyword" (select banners by keyword) or "size" (select banners on the basis of their size). The first one is useful if you net a client who wants exclusive advertising on your site, the second one comes in handy when you're trying targeted advertising (you don't want to sell romance novels to a person browsing for technical books, do you?) and the third is useful if you have a page layout that can be destroyed by banners which do not conform to a pre-defined size.
The second parameter, obviously, is a value that must be combined with the chosen selection method in order to select a banner.
The return value of the function is an associative array containing the unique ID and the label text associated with the banner. You can use these two parameters to display the banner, as shown in the example below:
<?php
require("/www/htdocs/phpbanner/require/config.php");
require("/www/htdocs/phpbanner/require/banner.php");
?>
<html>
<head>
<basefont face="Arial">
</head>

<body>

<table height="100%" width="100%" border="0" cellspacing="5"
cellpadding="5"> <tr>
    <td align="center">
<?php
$banner=get_banner("client","1");
?>
    <a href="http://www.mysite.com/phpbanner/link.php?banner_id=<?echo $banner[id];?>">
<img border=0 src="http://www.mysite.com/phpbanner/view.php?banner_id=<?echo $banner[id];?>" alt="<?echo $banner[alt];?>">
</a></td>
</tr>
<tr>
    <td height="100%" width="100%" valign="top" bgcolor="silver"
align="left">
    <h2>Sample page</h2>
    <center>
    Content here
    <p>
    Content here
    <p>
    Content here
    <p>
    </center>
    </td>
</tr>
</table>

</body>
</html>
When this page is accessed through a Web browser, phpBanner will wake up, read the argument passed to get_banner() function- the keyword "client" and client ID - and display a banner corresponding to that client.
If you look at the source of this page in your browser, you'll see that the call to
<?php

$banner=get_banner("client","1");

?>
returns an array that contains two parameters. The next line of code makes use of these two parameters to display the image and output the link associated with the banner.
<?php

<a href="http://www.mysite.com/phpbanner/link.php?banner_id=<?echo $banner[id];?>">
<img border=0 src="http://www.mysite.com/phpbanner/view.php?banner_id=<?echo $banner[id];?>" alt="<?echo $banner[alt];?>">
</a>

?>
Two important URLs to remember here: the one that returns the image associated with the banner, and the one that returns the URL associated with the banner Both these URLs require the banner ID as a GET parameter (as shown above).
Different Strokes
While using the "client" keyword selection makes sense if you get an exclusive advertiser, the truth is that you will have many advertisers vying for the prime spots on your site. And you're interested in satisfying as many clients as possible so that you can buy your own island and retire. Which is why you might prefer this:
<?php

$banner=get_banner("keyword","kids");

?>
In this case, phpBanner will display a random banner containing the keyword "kids".
You can even display a banner on the basis of its dimensions. Consider the following example, which displays a random banner of size 400x60:
<?php

<?php

$banner=get_banner("size","400x60");

?>
And if you're wondering if you can call this function more than once in your PHP script - no sweat. Take a look at the next example, which contain two banners, one at the top and one at the bottom of the page, and see how you can get rich twice as fast:
<?php
require("/www/htdocs/phpbanner/require/config.php");
require("/www/htdocs/phpbanner/require/banner.php");
?>
<html>
<head>
<basefont face="Arial">
</head>

<body>

<table height="100%" width="100%" border="0" cellspacing="5"
cellpadding="5"> <tr>
    <td align="center"><?php $banner=get_banner("client","1");?>
    <a href="http://www.mysite.com/phpbanner/link.php?banner_id=<?echo $banner[id];?>">
<img border=0 src="http://www.mysite.com/phpbanner/view.php?banner_id=<?echo $banner[id];?>" alt="<?echo $banner[alt];?>">
</a></td>
</tr>
<tr>
    <td height="100%" width="100%" valign="top" bgcolor="silver"
align="left">
    <h2>Sample page</h2>
    <center>
    Content here
    <p>
    Content here
    <p>
    Content here
    <p>
    </center>
    </td>
</tr>
<tr>
    <td align="center"><?php $banner=get_banner("keywords","Oracle");?>
    <a href="http://www.mysite.com/phpbanner/link.php?banner_id=<?echo $banner[id];?>">
<img border=0 src="http://www.mysite.com/phpbanner/view.php?banner_id=<?echo $banner[id];?>" alt="<?echo $banner[alt];?>">
</a></td>
</tr>
</table>

</body>
</html>
Wonder how this looks?
In case you're wondering if the same banner can appear more than once on the page, the developer clearly states that "...you may call get_banner()as many as you want, it won't be return any similar banner_id...".
Finally, the most important feature, at least as far as your advertisers are concerned: the reports which demonstrate how many eyeballs have seen their banners, and how many clicks have resulted. In order to assist you in generating these reports, phpBanner comes with a fairly simple report generating module.
All your clients can access banner statistics by clicking on the "My Banner" option in the menu. After entering their credentials, the Banner Manager will appear on the screen.
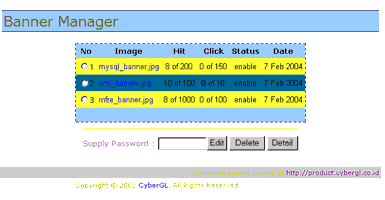
The above screen give the advertiser a quick overview of the number of hits and clicks of each and every banner uploaded to the application.
Clicking Through
And that's about it for this tutorial. In this article, I introduced you to one of the simplest banner management programs out there, and explained how you could integrate and use it on your own Web site. I guided you through the process of installing and configuring phpBanner, showed you how to add clients and banners, and also illustrated, with a simple example, the additions you need to make to your web pages to display these banners. Finally, I rounded the discussion up with a look at some of the additional options available in the get_banner() function.
Of course, phpBanner isn't the only option out there - there are lots of banner management programs available on the Web, and many of them are free. Here's a brief list:
PhpAdsNew, at http://phpadsnew.com/two/
NKAds, at http://nkads.nkstudios.net/english/index.php
PhpAdManager, at http://www.laughland.biz/phpmy.php?pageid=adman
Random Ad, at http://www.flash-here.com/downloads/randomad.html
I hope you found all of the above interesting, and that it encouraged you to try out phpBanner on your own Web site. So go on - give it a shot...and if you hit it big, remember to send a polite word of gratitude to the developers who spent lots of time and effort building this application!
Note: Examples are illustrative only, and are not meant for a production environment. Melonfire provides no warranties or support for the source code described in this article. YMMV!
This article was first published on09 Feb 2004.