Share And Share Alike
It's one of the most basic things a small- or medium-sized office needs, in order for its employees to work productively together: a centrally-accessible file server to store and share documents. Most of the time, this functionality is obtained through commercial file server software; Windows is the de facto standard, though other commercial options also exist.
However, if you're on a budget, spending a few hundred dollars for commercial software might seem like a needless expense - especially since there already exists a full-featured alternative: Samba, an open-source software project that allows you to replicate the full functionality of a Windows file server on a Linux box...at zero cost.
Sounds interesting? Keep reading, because over the course of this two-part article, I'm going to take you on a quick tour of Samba's file sharing features, demonstrating how you can use it within a home or small office environment as an effective replacement for your Windows file server. I'll be explaining what makes Samba tick, guiding you through the process of installing and configuring it, and then showing you how to tweak it to get it working just the way you want. So stop lounging about, and let's get started!
Speaking In Tongues
Let's start with the million-dollar question - what is Samba?
Pop open the dictionary, and here's what you'll see:
samba:
- large west African tree; 2. a lively ballroom dance from Brazil
The Samba Web site's definition is more prosaic, and also far more relevant to the task at hand: "Samba is an Open Source/Free Software suite that provides seamless file and print services to SMB/CIFS clients" (http://www.samba.org/)
Still confused? Let me translate. Very simply, Samba is a piece of software that sits on a Linux server and makes directories on it visible to, and usable by, Windows clients on the same network. By providing a central, easily-accessible location for file storage and organization, it allows users on a network to easily share files and documents with each other using standard Windows file manipulation commands and controls. As the Samba Web site succinctly puts it, "Samba runs on Unix platforms, but speaks to Windows clients like a native." (http://www.samba.org/samba/docs/SambaIntro.html)
As if that wasn't enough, Samba also supports a bunch of other cool features - user- and group-level security, name resolution, disk quotas, domain logons, roving profiles, service browsing - and can emulate (and sometimes surpass) the functionality of most commercial file servers. Best of all, Samba is free, a product of the open-source effort, and has gained immense popularity all over the world both for its feature set and its support for new technologies.
Samba works on the Server Message Block (SMB) protocol, which is designed to allow sharing of files, printers and ports between computers on a network. SMB ships standard with most recent versions of Windows, and is primarily responsible for allowing Windows systems to "see" and "talk" to each other on a network. With Samba, *NIX servers can speak SMB too - this allows them to communicate seamlessly with Windows clients and replicate the full functionality of a Windows SMB server.
A detailed discussion of how SMB works is beyond the scope of this tutorial - if you really want to know, drop by the official Samba Web site and take a look at their technical documents. If, on the other hand, you're more interested in seeing it in action, flip the page and let's get compiling!
Building Blocks
The first order of business to install Samba on the Linux box you plan to use as a server. Drop by the official Samba Web site at http://www.samba.org/ and get yourself the latest stable release of the software (this tutorial uses Samba 2.2.5).
Once you've downloaded the source code archive to your Linux server (mine is named "olympus.melonfire.com"), log in as "root"
$ su -
Password: ****
and extract the source to a temporary directory.
$ cd /tmp
$ tar -xzvf  /home/me/samba-2.2.5.tar-gz
Next, configure the package using the provided "configure" script,
$ cd /tmp/samba-2.2.5
$ ./configure
and compile and install it.
$ make
$ make install
Unless you specified a different path to the "configure" script, Samba will have been installed to the directory "/usr/local/samba".
You can verify this by doing a quick directory scan of that directory - here's what you should see.
$ ls -l /usr/local/samba
drwxr-xr-x    2 root     root         4096 Sep 17 17:31 bin
drwxr-xr-x    3 root     root         4096 Sep 17 18:43 lib
drwxr-xr-x    6 root     root         4096 Sep 17 17:24 man
drwxr-xr-x    2 root     root         4096 Sep 17 17:31 private
drwxr-xr-x    6 root     root         4096 Sep 17 17:24 swat
drwxr-xr-x    3 root     root         4096 Sep 18 12:01 var
Once you've got Samba installed, the next step is to configure it to work for your system. Let's look at that next.
Temporary Insanity
We'll start with something very basic - setting up a temporary file area on your Linux server, to be shared by all connecting Windows clients.
Samba configuration is handled via a single file, named "smb.conf", which is stored by default in Samba's "lib" directory. This file is not installed during the installation process; you need to manually copy it from the source archive (usually from the "examples" directory) into your Samba directory tree and modify it as per your requirements. I'm not going to be doing that in this article, preferring instead to create it from scratch for illustrative purposes; however, you should peek into the default file when you have a minute and study the well-commented examples in it to better understand the kinds of configuration options possible.
Create a file named "smb.conf" in Samba's "lib" directory,
$ vi /usr/local/samba/lib/smb.confand add the following directives to it:
[global]
        workgroup = medusa
        server string = "Primary file server, 40GB"

[temp]
        comment = Temporary file area
        path = /tmp
        read only = no
        guest ok = yes
As you can see, this configuration file is similar to a standard Windows INI file, in that it is broken up into different sections, each containing variable-value pairs. Sections are identified by square braces around the section name, and lines beginning with semi-colons (;) or hashes (#) are treated as comments and ignored.
The first section of the file sets up global variables for Samba to use - in this case, it identifies the server as belonging to a workgroup named "medusa", and gives it a descriptive label. This information will be used by Windows clients when building the Windows Network Neighborhood.
The second section sets up a "share" on the server - this is simply a directory that is available to all connecting clients. In this case, I've selected the "/tmp" directory, give it the share name "temp" and set it to be writeable by all users.
Once you've saved your changes to the "smb.conf" file, it's a good idea to verify that it doesn't contain any errors by using Samba's very handy "testparm" tool.
$ /usr/local/samba/bin/testparm
Load smb config files from /usr/local/samba/lib/smb.conf
Processing section "[temp]"
Loaded services file OK.
Press enter to see a dump of your service definitions
No errors? Time to start up Samba's "smbd" and "nmbd" daemons, and make the "temp" share available to connecting clients.
$ /usr/local/samba/bin/smbd -D
$ /usr/local/samba/bin/nmbd -D
If Samba starts up OK, you need to first verify that the configured shares are active. You can do this by using the built-in SMB client that ships with Samba - it's called "smbclient", and it's a very handy tool for debugging problems.
$ /usr/local/samba/bin/smbclient //olympus/temp
added interface ip=192.168.3.1 bcast=192.168.3.255 nmask=255.255.255.0
added interface ip=192.168.0.77 bcast=192.168.0.255 nmask=255.255.255.0
Password:
Anonymous login successful
Domain=[MEDUSA] OS=[Unix] Server=[Samba 2.2.5]
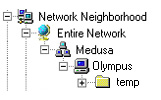
smb: \>If you can access SMB shares on the server itself, the next step is to check if you can access them from other Windows clients. Fire up one of your Windows clients, log into it and see if you can find your server, either in the Network Neighborhood or via the Find Computer dialog box.
Once you find the server, you should be able to see and use the shared directory on the server.
You can also mount the share as a Windows-accessible drive via a unique drive letter, using the "net" command. Open up an MS-DOS window and try this:
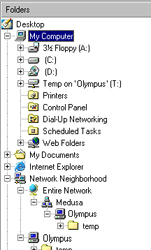
c:\> net use t: \\olympus\tempYou should now see the "temp" share on the server as drive letter T: in Windows Explorer.
Meet Joe Nobody
When you configure a temporary file area on the server using the bare-bones setting above, files and directories created in that area by a specific user are owned by that user alone, and other users cannot delete them. This is because the user and group permissions assigned to each file and directory by Samba reflect the user and group permissions of the connecting client.
This may be advisable in some cases; however, at other times, it can nullify the very purpose of a public file area. In case you'd like to change this default behaviour, you can force Samba to assign every file in this share a particular set of permissions - those that allow full access to all users - so that users can view and delete each other's files. The following configuration directives demonstrate:
[temp]
        comment = Temporary file area
        path = /tmp
        read only = no
        guest ok = yes
        force create mode = 0777
        force directory mode = 0777
        force user = nobody
        force group = nobody
Restart the Samba daemons,
$ killall smbd
$ killall nmbd
$ /usr/local/samba/bin/smbd -D
$ /usr/local/samba/bin/nmbd -D
and try creating a file in this temporary area - you'll see that the file is created with world-writeable permissions, and with user and group both set to "nobody", the least privileged user on most UNIX systems. This allows every user to view and delete every other user's files in the temporary area, making it truly "public".
You can simplify the process of starting and stopping Samba by creating a few simple shell scripts to do the job for you. Here are the scripts I'm using:
#!/bin/bash

# stop.sh - stop the Samba daemons
killall smbd
killall nmbd
#!/bin/bash
# start.sh - start the Samba daemons
/usr/local/samba/bin/smbd -D
/usr/local/samba/bin/nmbd -DHome Sweet Home
So that takes care of setting up a publicly-accessible share on the file server. Another very common task involves making each user's home directory on the server accessible to them on their Windows workstations, via Windows Explorer. This makes it possible to read and write files to home directories on the server using standard Windows file manipulation commands.
In order to make this simpler, Samba comes with a special "homes" section in its configuration file, designed specifically for this situation. Pop open your "smb.conf" and add the following lines to it:
[homes]
        comment = Home area
        writeable = yes
        browseable = no
        valid users = %S
Save your changes and restart the smbd and nmbd daemons.
$ killall smbd
$ killall nmbd
$ /usr/local/samba/bin/smbd -D
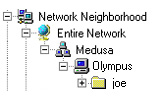
$ /usr/local/samba/bin/nmbd -DThis time, when you try connecting to the server via a Windows client, you should see your home directory in the list of shares, and you should be able to add and delete files from it.
How does this work? It's pretty elegant, actually - whenever an SMB client connects to the server with a share name, the configuration file is scanned for matches. If a match is found and all authentication tokens are satisfied, the share becomes available to the client. If, however, no match is found, but the requested share also matches a user on the system, the user's home directory is shared dynamically and made available to the requesting client.
In case you're wondering, the
browseable = noparameter tells Samba not to display this share in the list of browseable shares, while the
writeable = yesparameter makes the share writeable by the connecting client. Access is restricted via the
valid users = %Sparameter, which ensures that each user can only see his or her own home directory (%S is a special variable used by Samba; it is automatically replaced with the name of the service being accessed).
This special "homes" makes it possible for system administrators to quickly and efficiently give users access to their private home areas, with minimal configuration needed.
Just as you did with the previous example, you can also mount this share as a Windows-accessible drive via a unique drive letter.
c:\> net use h: \\olympus\homeYou should now see your home directory on the server as drive letter H: in Windows Explorer.
Access Denied
Next up, group file areas. You can create a separate directory for every group on the system, and expose these directories as shares accessible only to members of the respective groups. For example, consider the following extract from the "/etc/group" file:
accounts:x:503:john,joe,sarah
admin:x:504:tom,harry
hr:x:505:tom,joe
Corresponding to these groups are sub-directories in the /home/groups directory:
$ ls -l /home/groups
drwxrws---    2 root     accounts     4096 Sep 25 11:11 accounts
drwxrws---    2 root     admin        4096 Sep 25 11:11 admin
drwxrws---    3 root     hr           4096 Sep 25 11:14 hr
Note the sticky bit set in the group file permissions - this is necessary to ensure that files and sub-directories created inside each group directory are automatically masked with the group name.
These directories can be exposed as shares, simply by adding the following section to the "smb.conf" file:
[groups]
        comment = Group file area
        path = /home/groups/
        writeable = yes
        force create mode = 0770
        force directory mode = 0770
Restart the Samba daemons, and try connecting to the server. You should see all the sub-directories under the /home/groups directory, but should only have access to those you're a member of, as per the information in the "/etc/group" file. So user "joe" will be able to read and write to the "accounts" and "hr" directories, but will not even be able to view the contents of the "admin" directory.
You can map this directory on a Windows client to drive G:, like this:
c:\> net use g: \\olympus\groupsThis type of group-based access makes it easy to set up secure areas on the Samba file server for group-based collaborative file sharing, and restrict access to them in a manner similar to that found in other, commercial file server products.
Mounting Up
You can also make removable devices - for example, CD-ROM drives - on the server accessible as shares. Consider the following addition to "smb.conf", which exposes the device located at /mnt/cdrom as a Samba share:
[cdrom]
        comment = CD-ROM drive
        path = /mnt/cdrom
        public = yes
        writeable = no
In a similar manner, you can make other removable media drives on the server - floppy, Zip, Jaz or DAT drives - accessible as shares, simply by first mounting the device and then sharing it through Samba. If you're an efficiency freak, you can simplify the process even further by installing the Berkeley automount daemon, which takes care of mounting and unmounting devices automatically.
And that's about it for the first part of this article. In the preceding pages, I took you through the process of compiling and installing Samba on your Linux server, demonstrating how simple and painless the process really is. I also illustrated some of the most common Samba usage scenarios, showing you how to create shares on the server for temporary, home and group usage.
In the second part of this article, I'll be focusing on the ancillary tools that ship with Samba, demonstrating how they can be used to mount SMB shares on other workstations, perform backups, and simplify common administrative tasks. Make sure you come back for that one...and, until next time, stay healthy!
Note: All examples in this article have been tested on Linux/i586 with Samba 2.2.5 and Windows 98. Examples are illustrative only, and are not meant for a production environment. Melonfire provides no warranties or support for the source code described in this article. YMMV!
This article was first published on27 Sep 2002.